New to me 82 GN project basket case

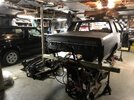
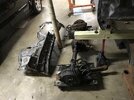
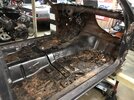
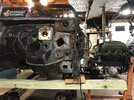
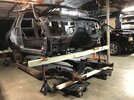
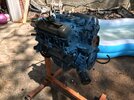
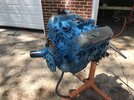
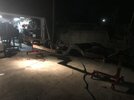
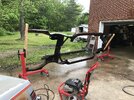
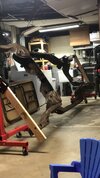
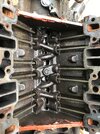
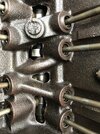
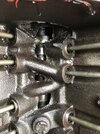
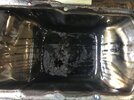
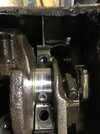
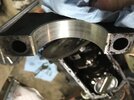
Pulled the intake off and it’s super clean inside had a little sludge at the bottom of the oil pan but it’s not bad at all. Pulled the #3 main cap to inspect the crank and bearings and the wear is actually very nice. Someone has been into it before just like I suspected it has had bearing replacement and the pistons look to have been replaced will get a bore scope so I can see if we can see any markings on them from where they’ve more than likely been upsized. All in all I’m very happy with the inspection so far.
 

Attachments

  • C0D85B9F-EA90-4F2A-B395-9F2A3CA101A8.jpeg
    C0D85B9F-EA90-4F2A-B395-9F2A3CA101A8.jpeg
    2.4 MB · Views: 363
  • 32BF8A5A-02E7-4F39-9802-6F8B0FF55D82.jpeg
    32BF8A5A-02E7-4F39-9802-6F8B0FF55D82.jpeg
    3 MB · Views: 316
  • FF44C4A0-2BA6-42B3-8E87-EAEC7E960871.jpeg
    FF44C4A0-2BA6-42B3-8E87-EAEC7E960871.jpeg
    2.7 MB · Views: 285
  • 769E0F80-AFA3-46AF-92B7-9E86B62EA83F.jpeg
    769E0F80-AFA3-46AF-92B7-9E86B62EA83F.jpeg
    2.3 MB · Views: 298
  • 20FEB4B6-3C82-42C9-AE2C-B88779B43909.jpeg
    20FEB4B6-3C82-42C9-AE2C-B88779B43909.jpeg
    1.3 MB · Views: 291
  • 8A2356F3-7A26-4B99-80C1-BD50623804FF.jpeg
    8A2356F3-7A26-4B99-80C1-BD50623804FF.jpeg
    1.2 MB · Views: 289
Looks like it still has the turbo crankshaft in it. If the pistons are aftermarket replacements, they should be marked in the dish if they are standard, .030 over, etc.
 
I looked at the picture wrong. You have to pull a rod cap off to check and see if a turbo crank is still in there.
 
Found it on Facebook. It’s a very rough car. It has bad rust in firewall, floor pan, a pillar and windshield header. No big deal as I have a perfect firewall for it and they reproduce everything else. I’m the second owner and it was in Nashville it’s whole life really not sure how it got so rusty as it was only on the road for about 10 years
 
Cleaned the car out and getting ready to start prepping it for the floor pan and firewall removal and replacement. Also organized all the parts I’ve accumulated with my shelving from work finally. The 4.1 looks to be healthy and not that old of a rebuild so it will get a new gasket kit and just send it once it’s cleaned up and painted in wonderful corporate blue.
 

Attachments

  • 27836F58-A711-4297-8886-766A50587083.jpeg
    27836F58-A711-4297-8886-766A50587083.jpeg
    2.6 MB · Views: 268
  • 616E72B3-A67A-4E3E-9B84-57BF42B8BCB8.jpeg
    616E72B3-A67A-4E3E-9B84-57BF42B8BCB8.jpeg
    2.3 MB · Views: 270
  • FE74771E-134C-4137-AF30-3A75B7B70180.jpeg
    FE74771E-134C-4137-AF30-3A75B7B70180.jpeg
    2.9 MB · Views: 257
  • 6EE64A5E-EB74-4B55-90F7-66621DA52FFC.jpeg
    6EE64A5E-EB74-4B55-90F7-66621DA52FFC.jpeg
    1.5 MB · Views: 270
  • 48D4FF41-0EB9-4AA8-8806-ED3DFE8E1432.jpeg
    48D4FF41-0EB9-4AA8-8806-ED3DFE8E1432.jpeg
    2.9 MB · Views: 311
  • 8C533C2A-B9A6-45D2-80F7-A456140FF4CC.jpeg
    8C533C2A-B9A6-45D2-80F7-A456140FF4CC.jpeg
    2.7 MB · Views: 265
Floor pan came in about two weeks ago I finally got it out of the box
 

Attachments

  • A9CB5067-6C6B-4572-A638-35C6C9728A40.jpeg
    A9CB5067-6C6B-4572-A638-35C6C9728A40.jpeg
    1.1 MB · Views: 279
Please post lots of pictures and comments about the floor pan installation. I'm very interested to learn how straight forwardl the new replacement floor pan fits without a lot of tweeking.
 
I give you credit i did a floor pan on a 69 Camaro and it was a royal pain in the rear. Did you get inner rockers or your solid?

They are solid, I know that this pan has to be modified around the rear seat because it’s a el Camino stamping.
 
Please post lots of pictures and comments about the floor pan installation. I'm very interested to learn how straight forwardl the new replacement floor pan fits without a lot of tweeking.

I hear they aren’t that bad but they do have to be modified around the rear seat area. Hopefully it fits well.
 
First round of fresh paint went on the engine yesterday
 

Attachments

  • 0D2D7E63-4172-4557-8004-CB7D981AD9AC.jpeg
    0D2D7E63-4172-4557-8004-CB7D981AD9AC.jpeg
    3.5 MB · Views: 255
  • 7AD70778-1C2C-4B7B-AABC-F2B4E162E54D.jpeg
    7AD70778-1C2C-4B7B-AABC-F2B4E162E54D.jpeg
    3.5 MB · Views: 225
I think I’m going to do my seats like this set I saw on one of the interior threads, leather and suede I think it looks very nice and clean. Unfortunately my original upholstery is trash and I think it’s worth updating to better materials. I also was able to locate a original 82 GN radio and have purchased it complete with knobs and bracket. All of the suspension parts to make the frame a roller once it’s painted are on the way along with a set of 82 GN wheels and I ordered the new updated 82 caps from gbodyparts. I got shielding gas for the welder and set it up just need to start practicing my tacks and get the body braced and measured up and cut the original firewall and floor out for the replacements.
 

Attachments

  • 4DE21EC4-21D6-44CF-99DE-3CDDBDB79650.jpeg
    4DE21EC4-21D6-44CF-99DE-3CDDBDB79650.jpeg
    136.5 KB · Views: 248
  • AEFCE58D-76A4-497B-BBCD-141918D393B2.jpeg
    AEFCE58D-76A4-497B-BBCD-141918D393B2.jpeg
    498.8 KB · Views: 232
Just opened the boxes up so far I have received both new lower control arms, all new shocks, all new spring insulators, new bump stops, new tie rod ends, and a few other odds for the engine. I ordered all new control arms and I must say the lowers I just received look very nice!
 

Attachments

  • 3C6E722D-8465-4FB1-949F-40C1C3E15E77.jpeg
    3C6E722D-8465-4FB1-949F-40C1C3E15E77.jpeg
    1.1 MB · Views: 196
  • 4CB0F4D0-5790-4631-B958-2C582DADC1E8.jpeg
    4CB0F4D0-5790-4631-B958-2C582DADC1E8.jpeg
    2.4 MB · Views: 235
Todays parts arrival we have the new upper control arms, new center link, tie rod sleeves, idler arm, new fuel pump, new wheel bearings, new brake lines and also the new updated 1982 GN center caps that gbodyparts offers and I must say the quality is super! Just as nice as the black caps they offer!
 

Attachments

  • C6CA4601-A012-48AA-A8DB-F64EAC1C744C.jpeg
    C6CA4601-A012-48AA-A8DB-F64EAC1C744C.jpeg
    2.8 MB · Views: 223
  • F12E1AE9-E384-4755-9FAC-3BC3F76E498A.jpeg
    F12E1AE9-E384-4755-9FAC-3BC3F76E498A.jpeg
    2.3 MB · Views: 207
  • AD951885-961C-4D27-A77F-27489C93D18E.jpeg
    AD951885-961C-4D27-A77F-27489C93D18E.jpeg
    2.1 MB · Views: 225
Got the frame mounted up on the engine stands and got the correct wheels in today. Going to get some more dollies tomorrow to set the body on to roll it around. Would like to get the frame back inside to start working on the prep work for it.
 

Attachments

  • 627655CE-3967-489A-816E-6A577EFABE6D.jpeg
    627655CE-3967-489A-816E-6A577EFABE6D.jpeg
    2.8 MB · Views: 163
  • 1E4E1690-CDD9-4920-AC0E-495D4812F826.jpeg
    1E4E1690-CDD9-4920-AC0E-495D4812F826.jpeg
    2.1 MB · Views: 173
  • 121AB15F-6EE2-46BD-8512-6D1391BAF5F3.jpeg
    121AB15F-6EE2-46BD-8512-6D1391BAF5F3.jpeg
    2.2 MB · Views: 167
  • D6B85287-D5D2-4FC6-AAAE-DCD449AEF050.jpeg
    D6B85287-D5D2-4FC6-AAAE-DCD449AEF050.jpeg
    1.5 MB · Views: 168
Pressure washing the frame the easy way. Also ordered this frame coating kit after doing some research it seems to be a pretty good product and should work well for what I’m doing
 

Attachments

  • 3664DEF8-01E6-41DE-A575-DDE8FBB2B3F9.png
    3664DEF8-01E6-41DE-A575-DDE8FBB2B3F9.png
    3.8 MB · Views: 168
  • B235A8E0-29F3-47BA-B48A-A6DE19D9777E.jpeg
    B235A8E0-29F3-47BA-B48A-A6DE19D9777E.jpeg
    4.7 MB · Views: 171
Got a about 55-60% of the frame wire wheeled yesterday before I cooked my cheap grinder. Will pick up another one today probably and maybe continue working on it this evening. Also stripped the clear coat off the wheels but they have some corrosion that needs to be addressed. I’m going to see about getting some quotes on getting them refinished and or possibly polishing them myself undecided what I’m going to do at this point.
 

Attachments

  • E10582F1-4ED8-4078-9F03-D50EA74B2313.jpeg
    E10582F1-4ED8-4078-9F03-D50EA74B2313.jpeg
    472.8 KB · Views: 152
Top