LT1 MAF inside Stock Airbox

UNGN

Can't Re- Member
Joined
May 24, 2001
Here are some pictures/descriptions for having a stock appearing Airbox AND a 3" LT1 MAF. It's very sneaky and unless you look very closely really looks stock.

For performance, it should be good into the 10's.

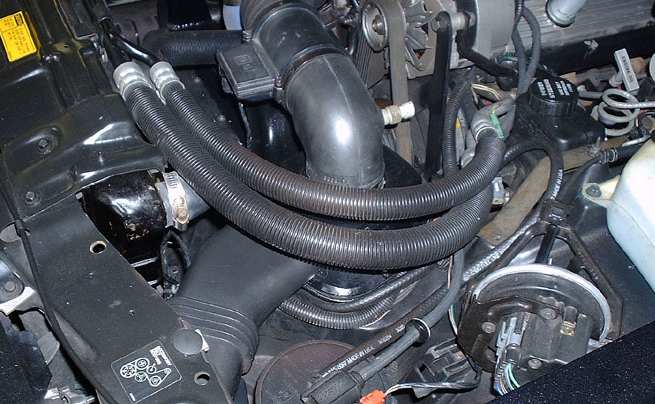
Installed in the car:

airfilter2.jpg


Here is my original modified lid and base compared to the stock lid:
 

Attachments

  • Dscn0909.jpg
    Dscn0909.jpg
    87.5 KB · Views: 1,083
  • Dscn0906.jpg
    Dscn0906.jpg
    95.8 KB · Views: 1,055
  • Dscn0907.jpg
    Dscn0907.jpg
    79.7 KB · Views: 1,046
  • Dscn0908.jpg
    Dscn0908.jpg
    104.8 KB · Views: 1,032
For my new version, I'm making new brackets, using magnets to hold the lid on and using a super high flow K&N filter (the biggest/highest flow Filter I can cram into the base)

First step is to remove the neck from the Lid.

10 minutes with a Dremel tool and a cut-off wheel:
 

Attachments

  • Dscn0914.jpg
    Dscn0914.jpg
    67 KB · Views: 966
  • Dscn0915.jpg
    Dscn0915.jpg
    80.5 KB · Views: 943
  • Dscn0917.jpg
    Dscn0917.jpg
    61.4 KB · Views: 967
  • Dscn0920.jpg
    Dscn0920.jpg
    64 KB · Views: 934
Once the neck rotates freely, its ready to pop out (the LT1 MAF will fit in it's place):
 

Attachments

  • Dscn0921.jpg
    Dscn0921.jpg
    65.9 KB · Views: 926
  • Dscn0924.jpg
    Dscn0924.jpg
    56.4 KB · Views: 912
  • Dscn0926.jpg
    Dscn0926.jpg
    90 KB · Views: 923
Mods to the LT1 sensor take the most time, I think, because you have to take a lot off the dia to get the elbow over the neck of the LT1 sensor.

If the Elbow had a MAF sensor side opening on both ends, you practically wouldn't have to mod it at all.

Here is a my original modded MAF (right) compared to a stock, screenless LT1 MAF that I will be modding for this how to (left) slightly differently from the original:
 

Attachments

  • Dscn0927.jpg
    Dscn0927.jpg
    103.8 KB · Views: 956
  • Dscn0928.jpg
    Dscn0928.jpg
    85.6 KB · Views: 958
  • Dscn0929.jpg
    Dscn0929.jpg
    55.5 KB · Views: 948
Here's how the LT1 sensor fits into the Lid.

The top 2 are my original modded lid, the bottom picture is the sensor I'll be modding and the new lid:
 

Attachments

  • Dscn0933.jpg
    Dscn0933.jpg
    49.8 KB · Views: 931
  • Dscn0934.jpg
    Dscn0934.jpg
    48.9 KB · Views: 967
  • Dscn0938.jpg
    Dscn0938.jpg
    40.5 KB · Views: 935
The sensor needs very little modding to fit into the lid. Most of the work is adapting the filter of choice and the Elbow, but here is where you can trim for more clearance.
 

Attachments

  • Dscn0935.jpg
    Dscn0935.jpg
    44.4 KB · Views: 912
  • Dscn0936.jpg
    Dscn0936.jpg
    52.7 KB · Views: 929
  • Dscn0937.jpg
    Dscn0937.jpg
    47 KB · Views: 925
  • Dscn0962.jpg
    Dscn0962.jpg
    36.4 KB · Views: 922
For a little more clearance for the sensor and plug, you can remove some of the lid material where marked (where the sheet metal is double thick here and you can remove the inside layer):
 

Attachments

  • Dscn0967.jpg
    Dscn0967.jpg
    33.7 KB · Views: 900
  • Dscn0968.jpg
    Dscn0968.jpg
    27.3 KB · Views: 903
LT1 Sensor mods

Mods to the MAF.

First, this is a 3" LT1 sensor. A 3.5" sensor will not work. Its hard enough to adapt the 3" sensor to the stock Plastic Elbow.

First, use a T15 Torx to take the sensor apart and store the sensitive bits away while you hack on the ends.

The Screen is popped out. It should work fine without a screen. It will flow better without a screen and the K&N will do a good job straightening the flow.
 

Attachments

  • Dscn0939.jpg
    Dscn0939.jpg
    120 KB · Views: 893
  • Dscn0940.jpg
    Dscn0940.jpg
    76 KB · Views: 877
How you modify the Filter side of the MAF depends on what Filter you use.

If you have a 3.5" opening filter, the MAF will flow best if you cut the Screen ridge completely off and turn the whole front of the MAF into a Radius (See the one on the right)

The only drawback to this is the filter is very hard to mount to the MAF, since you've cut away all of the mounting surface, but the flow is good. You have to remove the block as shown (a hacksaw works good for this).

A dremel cut-off wheels is used to make slots in the surface for the filter to grip to. This was version 1. For Version 2, we are going with a 3" neck filter and MAF gets modded slightly differently.
 

Attachments

  • Dscn0931.jpg
    Dscn0931.jpg
    64.3 KB · Views: 858
  • Dscn0932.jpg
    Dscn0932.jpg
    56.8 KB · Views: 860
  • Dscn0927.jpg
    Dscn0927.jpg
    103.8 KB · Views: 868
A hacksaw removes most of the filter barb, but leaves just a little so the filter wants to stay on the MAF. Put a good radius on this cut going into the MAF.

This is a compromise between flow and ease of filter attachment. I'm going with ease of Filter attachment, here.
 

Attachments

  • Dscn0949.jpg
    Dscn0949.jpg
    58 KB · Views: 860
  • Dscn0944.jpg
    Dscn0944.jpg
    44.4 KB · Views: 843
  • Dscn0951.jpg
    Dscn0951.jpg
    51.3 KB · Views: 842
Here is my gen 1 Filter: 6" (5.5" filter) X 3.5" opening that went 11.53@118 with a stock motor on drag radials with only a TA49, 36# bluetops and a big neck intercooler.

a 1/4" thick strip of rubber takes up the space in the filter.
 

Attachments

  • Dscn0956.jpg
    Dscn0956.jpg
    108.2 KB · Views: 879
  • Dscn0954.jpg
    Dscn0954.jpg
    52.8 KB · Views: 846
  • Dscn0952.jpg
    Dscn0952.jpg
    64.3 KB · Views: 867
  • Dscn0957.jpg
    Dscn0957.jpg
    43.2 KB · Views: 859
Here is version 1's "look" in the lid and two filters that will work (5" base, 5- 6.5" length). The Filter for version 2 is about an inch larger in diameter and and will be the biggest/highest flowing K&N filter than can still use the stock base.
 

Attachments

  • Dscn0964.jpg
    Dscn0964.jpg
    61.8 KB · Views: 897
  • Dscn0970.jpg
    Dscn0970.jpg
    76.6 KB · Views: 901
  • Dscn0971.jpg
    Dscn0971.jpg
    71.5 KB · Views: 891
  • Dscn0975.jpg
    Dscn0975.jpg
    61.2 KB · Views: 873
  • Dscn0976.jpg
    Dscn0976.jpg
    59.9 KB · Views: 874
Tomorrow will be mods (destruction) of the factory MAF and adapting the LT1 sensor to the Elbow.

Later will be base mods and high flow Airfilter.
 
:cool: VERY nice! :cool:

Have you ran this set-up at the track yet?
The reason I ask, is that the plastic elbow has been stated to be a "major restriction" in the intake system.
While there is some merit to that statement, is it enough to hold the car back from mid 11's?
Edit;
Nevermind, I read the page in the link in your sig - 118mph! SWEET LORD!!


Thanks for sharing! :cool:
 
I LOVE this setup, BTW it was done many years ago for stock appearing racing. Your setup may be even a bit nicer in desgn. Be aware that the sensor will read a bit lean when modifed like this my guess is about 10%. Nothing to panic about just add some fuel. :D
Mike
 
I actually did this mod over 9 years ago. I used it in the stock appearing class at Buicks at Bristol in 2001 and ran pretty easy 11.7's at 23 spi, but nobody else showed to race me.

The best is has gone is 11.53 @ 118.3, but this was with BFGDR's, 36# injectors, a 100% stock motor, a TA49 with a Garrett housing and a stock intercooler with a big neck.

With my new motor it should get very close to the high 10's @ 123 on drag radials.
 
Top