Update:
Installed my Tin Man back seat brace I purchased from Kirban's, and I thought I would drop a few helpful hints as on the advice of my mechanic, we deviated with the ( very well written ) instructions somewhat. I apologize for being kind of boring and not having any pictures, but I didn't have my camera. Pretty straight forward, though, but still kind of out of my comfort zone. I am sure some others might feel the same. That's why I chose to write it up and my trusted mechanic to help.,
First, we didn't weld or rivet it in place. I listened to my mechanic's advice and since he has treated me well before ( he installed my body bushings) we used the supplied hardened bolts and nuts with the lock washers and loctite.
I purchased some spring loaded clamps from the hardware store. We used five clamps, altogether. ( if you have some vice grip c-clamps they will work a lot better. )
That being said, remove the carpet from the trunk to include the carpet that is directly behind the back seat , in the trunk area .
Chock at least one of the front wheels as you don't want her to roll forward or backward.
Put the rear of the car on jack stands, just as the instructions say, to be able to remove the back wheels. Mine were only off the ground maybe 2 inches tops , just enough to remove the wheels.
Use a quality level and be certain that the car is level from side to side.
Next, remove the back seat bottom and top and seat belt anchors. The instructions are pretty comprehensive with regard in how to do this. (The bottom on mine was a little difficult because it had apparently never been out before.) Carefully remove any insulation material that doesn't allow free access to the existing sheet metal between the seat back and the trunk.
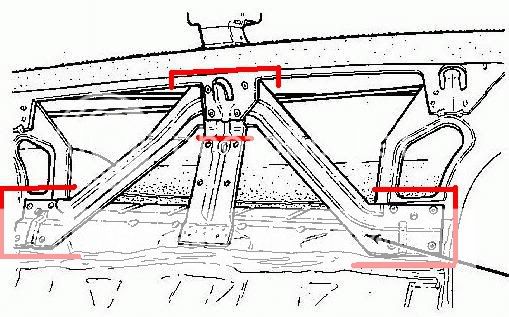
Trial fit the brace. You may have to cut / trim some of the seam sealer that was slopped on at the factory to allow the brace to sit flush. ( We had to do this at the bottom corners and along the top.) A sharp razor blade works well for this, just take your time. Flush fitment is very important.
One you get the brace to sit flush, clamp it in place and check again for fitment.
Assuming you are satisfied, time to start drilling. In a testament with regard to tinman's product, the *approximate* places to drill were clearly marked and extremely helpful. (To see what I mean, Google "tin man GNX brace" and there is a good picture of what I am talking about. Mine were "spot on" as all lined up perfectly.)
So, with the clamps in place , grab the supplied smaller drill bit ( I am sorry but the exact size escapes my memory ) and drill a hole through the brace and the car's existing sheet metal in both top corners. What we did next wasn't specified in the instructions, and since my mechanic always wants things *perfect* -- gotta love the kid -- we secured both top corners temporarily with a couple of sheet metal screws and we also kept all the clamps in place.
Funny thing , I asked him if using both might be a little overkill. He said ," Man, it might be YOUR car, but it is MY reputation." Like I said, gotta love the kid.
We then did the two in the middle just below the bend in the brace, did the same with some sheet metal screws, and then did the same with the inner ones on the "wings" . He said he did it this way to make certain the brace was in place. Satisfied that was where he wanted it, we drilled the rest of the holes taking care NOT to nick the fuel line or any other wires / lines that ran along the frame rails. So, he secured those with screws as well, looked at the brace, smiled and said " Now, *that* is tits!"
Next step was to use the larger supplied bit ( 3/16 inch I think ) and he removed one upper screw at a time and drilled the final hole. After each hole was drilled, he secured it with the supplied bolt/nut and the clamps to keep it in place.
After every hole was drilled and brace secured - temporarily- he grabbed a white marker / crayon and traced around the brace at each of its mounting points and where came in contact with the existing body sheet metal. He then removed the brace and with some course sandpaper, roughed up the area on the body mount areas as we'll as the areas on the brace where it would contact the car.
This is another area where we deviated a little from the instructions. He grabbed some 2 part ( epoxy?) stuff he called "seam sealer". He said it was used to bond metal to metal. He put a bead inside where he had traced and roughed up,with the sandpaper and used a brush to spread it around. He did the same to the brace, itself. It ended up being a fairly thick coat on both.
I then oh so carefully handed him the brace and he temporarily secured it at the corners with the bolts to hold it in place. Using loctite, he then inserted the rest of the bolts, snugged them up, and then loctited and snugged up the corners removing clamps as he went. Grabbing a small impact wrench, and a wrench for the nuts, he started from the center and worked his way around the brace doing the final torquing.
He then told me, " That brace isn't ever going anywhere. " I agree.
It ended up being a very professional looking job. As far as driving it goes, even with the previously installed new body bushings, the new kyb has shocks, the Sc&c front triangular brace, the rear upper shock mount bracing , I noticed yet an even more solid feeling. It was well worth the trouble and I learned even more about my car.

")