You can type here any text you want

Another MS3Pro Evo build

Welcome!

By registering with us, you'll be able to discuss, share and private message with other members of our community.

SignUp Now!
This doesn't really have much to do with the Megasquirt install, more of dealing with the customized 4bbl intake and the problems it created.

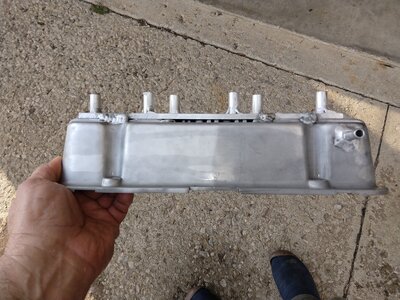
I moved the plate the holds the coils a little higher on the valve cover to fix the clearance issue against the heater box. When I put things back together, then I noticed that the valve cover itself was touching too. Cut off the corner, weld in a small filler piece and that is fixed.
View attachment View attachment
The 4bbl throttle body needed a cable bracket for accelerator and TV cable. Also had to make a lengthened tab for the TV cable attachment "nub". The brackets that hold the fuel rails required the bracket sit a little farther away than normal.

View attachment View attachment View attachment
Intake pipe got fitted and welded up. It is right in the way of the upper radiator hose going to the thermostat housing. Mine come out of the top instead of the front. So, I made a custom job to go under the intake pipe. I'm going to add an air bleed screw at the top, the bung just hasn't showed up yet. I might not work at all.

View attachment View attachment View attachment View attachment
 
Whens the next start up? I would like to look at the program ..
 
The car is packed away for winter. If I had a heated garage, work might continue, but for now it's too cold and I'm too old. I really only need to hook up fuel lines and run the ECU to somewhere in the cabin.

I did find a pic of the day I bought it. Not sure of exact date, but photograph had a date on the back when it was developed of Dec 88.

33 freakin years ago. Damn I feel old.
View attachment
 
No real work done on the car yet, as it's still to cold to be enjoyable, but I did come up with a place for the ECU. Current plan is to relocate the battery to the trunk and put the ECU in the stock battery location. The boys got a 3D printer for Christmas and I did my first real project with it.

It should keep the MS3box pretty well protected and I can still communicate with it via the bluetooth adapter.
I figure it used about $15 worth of PLA (the 3D printer plastic "wire") and took 29 hours to print.
 

Attachments

  • 0 bytes · Views: 74
  • 0 bytes · Views: 71
  • 0 bytes · Views: 72
  • 0 bytes · Views: 71
  • 0 bytes · Views: 66
Cool project nicely done. Where are you in Ohio?
About 30 miles north of Columbus out in the boonies. Hoping to get the car to run tomorrow! Got 2nd covid shot today and taking tomorrow off work to work in wiring. A bunch of relays and fuses to get wired up. Going to make sure it runs before I try to make it "pretty". I did move the battery to the spare tire well to make room for the ECU up front.

I'm having trouble getting my laptop to see the MS3 using the bluetooth adapter. I an see the adapter, but Tuner Studio can't communicate with the MS3. I'll try some different laptops and various phones tomorrow before I completely give up. Open to any suggestions about this.

Next steps for this summer:
intercooler (buy tubing & weld)
E-85 (adding flex fuel sensor)
rebuild rear axle (might just hire that done)

Then it is done until the transmission blows up. It is a fresh stock rebuild so it may last a little while. I have a BRF in the barn that I may just run up to Janis transmissions (or go with manual).

Eventually:
manual boost controller
digital dash display
 

Attachments

  • 0 bytes · Views: 66
  • 0 bytes · Views: 66
I made the maiden voyage down the road today! Still no hood on the car and wiring looks like hell, but everything seems to be working correctly.
I just went about a mile down the road and back and didn't build any boost. I used the "Auto-Tune" tool in Tuner Studio and it seemed to work perfectly for the short trip. The plan is to work into things very gradually and keep a close eye on the A/F gauge.

Tuner Studio wouldn't communicate with the ECU using the bluetooth adapter so Perfect Tuning upgraded me to a wireless ethernet one that worked perfect. They admitted that they had a bad batch of bluetooth units go out that weren't working correctly.

I still need to get the oil and fuel pressure sensors wired up and my temp gauge on the dash doesn't work.

Anyway, here is a short vid of it running in the car after the trip.
 
Another screw up. I thought I had to fabricate up a bracket for the TV cable to attach to the the Holley Throttle body that I am using. I hacked the arm off of an old GM carb and make a little bracket to bolt to the throttle body with a COMPLETE disregard for the geometry and length that the TV cable would be pulled. I went for a test drive and finally started giving it a little gas and the shifts were complete mush at about 1/2 throttle. A few minutes of research (literally) explained that my location for the TV cable stud was completely wrong and Holley even provided the correct hole that I should have used. I just ordered a mounting stud for the cable and will make things right when it shows up.

Pics attached of how I did it and how it should be done.

I still need to wire up:
oil pressure
fuel pressure
VSS & brake pedal (for lockup converter)
 

Attachments

  • 100_4108.JPG
    100_4108.JPG
    1.3 MB · Views: 155
  • 100_3035.JPG
    100_3035.JPG
    1,010.6 KB · Views: 139
The engine is basically done and I have put about 100 miles on it over the weekend.

I am limiting things to 10psi for the first few hundred miles but it is running pretty good. I used the Tuner Studio "Autotune" tool for quite a bit of driving around. It required having the laptop open and running, but actually seemed to work very well.

Engine summary:
MS3Pro Evo
Weiand 4bbl intake with injector bungs
Seimens Deka 60lb/hr injectors
IGN1A coils mounted to valve covers
Holley 4150 Throttle body (looks like a 4bbl carb)
Limited Engineering TA60 turbo
GN1 aluminum heads
Crane 212/212 Cam (Part # 69-000-8)
T/A 1.65 ratio roller rockers
PAC Racing 1200 Series Valve Springs PAC-1201
Comp 885 lifters
Scat 4340 forged crank & steel center caps
DIY 36-1 trigger wheel & stock cam sensor for timing

Bad things:
My DIY power steering reservoir has the return lines coming in it too high and the power steering fluid foams. I'm going to start over from scratch on it.

Fuses & relay job is clunky. I need to make a junkyard run and find something better.

Catch can isn't cutting it without a real vacuum source. I'm still not sure what I am going to do there. 3/8 hoses go from each valve cover to a catch can that vents pre-turbo. Still getting a lot of blowby coming from dipstick tube.

The trans is a fresh bone stock rebuild and I'm sure it won't last. I have a BRF core to take up to Janice or else just throw the old 350 turbo in it that I used to use every time a blew up a 200-4r. Not having overdrive sucked, but it isn't a daily driver anymore. I'm old now, but I used to be able to swap out a transmission in a couple of hours back in the day.
 

Attachments

  • d58ae472_565f_44a6_85b4_aac42ea4f922_11c53c308ef4a896ca0a458f2d2a0fa424cb7712 (2).jpeg
    d58ae472_565f_44a6_85b4_aac42ea4f922_11c53c308ef4a896ca0a458f2d2a0fa424cb7712 (2).jpeg
    198 KB · Views: 113
  • IMG_4686.jpg
    IMG_4686.jpg
    3.1 MB · Views: 121
  • IMG_4687.jpg
    IMG_4687.jpg
    2.4 MB · Views: 177
  • IMG_4688.jpg
    IMG_4688.jpg
    3.1 MB · Views: 119
  • IMG_4689.jpg
    IMG_4689.jpg
    1.9 MB · Views: 117
  • IMG_4691.jpg
    IMG_4691.jpg
    2 MB · Views: 124
  • IMG_4690.jpg
    IMG_4690.jpg
    2.4 MB · Views: 119
  • IMG_4679.jpg
    IMG_4679.jpg
    1.9 MB · Views: 127
  • IMG_4680.jpg
    IMG_4680.jpg
    2.3 MB · Views: 122
Hell of a job putting all of that together. Keep up the nice work. It will be very interesting to see how much you can get out of the combo.
 
I officially won't ever miss my draw-thru carb setup. I finally turned up the boost (too much). The boost gauge pegged at 20psi and lit up the tires at a rolling 40mph. Now the tires are crap so that isn't saying a whole lot, but the carb setup never had anything close to this. Boost has been turned back down to 19ish until I can get a professional tune done.

E85 components just came in and I am hoping to get it set up on Sunday.

I'm reposting several pictures since the site crash lost everything.

3d printed ECEU box that replaces the battery
Home built 36 tooth trigger wheel and sensor
valve covers for LS coils
Custom thermostat housing for 4bbl intake that goes under turbo intake (now has are bleeder screw)
 

Attachments

  • 4.jpg
    4.jpg
    742.1 KB · Views: 77
  • IMG_20181111_110719915.jpg
    IMG_20181111_110719915.jpg
    560.9 KB · Views: 63
  • 5.JPG
    5.JPG
    55.2 KB · Views: 54
  • IMG_20181111_110816621.jpg
    IMG_20181111_110816621.jpg
    343.4 KB · Views: 49
  • IMG_20181111_110843965.jpg
    IMG_20181111_110843965.jpg
    859.9 KB · Views: 64
  • IMG_20200128_153051836.jpg
    IMG_20200128_153051836.jpg
    323.6 KB · Views: 46
  • IMG_20200128_153458384.jpg
    IMG_20200128_153458384.jpg
    749.5 KB · Views: 56
  • IMG_20201120_133942017.jpg
    IMG_20201120_133942017.jpg
    888 KB · Views: 56
  • IMG_20201216_205230778.jpg
    IMG_20201216_205230778.jpg
    794.2 KB · Views: 76
  • IMG_20230403_124607754_HDR.jpg
    IMG_20230403_124607754_HDR.jpg
    844.4 KB · Views: 74
Use the Autotune with good AFR targets and reasonable timing it will be fine. YOu need good coil dwell numbers all the info is available my FB groups.
 
Hi Shawn Great job on your engine build. I am thinking of doing a similar swap, would you recommend getting the 86-87 intake manifold or are you happy with your choice of intake, throttle body, and injectors.
 
I'm completely happy with my setup, but if you have access to a stock intake, it would make things easier because everything would just fit. I had to fabricate throttle & TV cable bracket, and thermostat housing was complicated too. I got a great deal on the manifold with injector bungs already in it and just kept on adding parts from there.
 
Thanks, I have an old holly projection I was thinking of using but no manifold. I appreciate your input and will probably look around for an 86-87 manifold.
 
Back
Top