How to? Vacuum brake Conversion
- Thread starter Tonyrodz
- Start date
Welcome!
By registering with us, you'll be able to discuss, share and private message with other members of our community.
SignUp Now!You are using an out of date browser. It may not display this or other websites correctly.
You should upgrade or use an alternative browser.
You should upgrade or use an alternative browser.
- Joined
- Aug 1, 2003
- Messages
- 9,769
brakes should not need to bled if the system was good before
the master needs to be bled before install and workout the bubbles ,then you just need to get the bubble out where the lines connect to the master
the master needs to be bled before install and workout the bubbles ,then you just need to get the bubble out where the lines connect to the master
Not a bad job. Worst part is the pedal swap. Its pretty tight under there. Maybe a 4 out of 10 dificulty level. Its just a bolt in job. Limited space makes it harder that it really. Should be. I had mine done in under 2 hours not counting prep on the booster, pedal and master?
Agree mostly with above, but more conservative in estimate. I'm a self declared auto DIYer and have done lots of projects on my GN over the years including PMs, baer disks, drums, lines, etc. I spent a lot of time reading the forums and gathering information to include the steps on the gnttype site. Also picking my components and procuring them. Researching and buying proper paints for booster and cylinder and prepping and painting those parts before install. I live in a 'small town' and I had a hard time finding vac lines to replace the ones on my vacuum block that looked suspect when I switched the block out. (not technically part of the brake conversion...but additional self imposed tasks). Bleeding the cylinder is easy with the right bleeder tool.
The actual install is not too too bad. But I'm 5' 10', 160lbs....I can't imaging a big muscular weight lifter guy doing it - I had a hard time maneuvering under the dash to get the brake pedal work done (nuts on an off, pedal installed/aligned, etc). one of the mounting bolts for the PM assembly (now the booster assembly) had a 'push nut' on it in addition to the regular nut...that was a pita to get off. Also spent some time cleaning and 'arranging' the myriad of lines that traverse the area where the booster mounts to the firewall. I also bled my brakes after final assembly because I wasn't sure or confident I could "get the bubble out where the lines connect to the master" as mentioned above. I sometimes overkill my thoroughness. New/clean brake fluid can't hurt anyway. Oh yeah, my brake light switch needed to be adjusted after all the work in that area (small task).
If everything would have been lined up ready to go, sure 2-3 hours labor...but in reality, took me two Saturdays of about 4 hours each on car...and then all the prep work I described.
piece of cake ;-)
good luck
- Joined
- Aug 1, 2003
- Messages
- 9,769
How and why does the brake light switch need to be adjusted?
thebrake switch and cruise switch has to hit the pedal and be in the depressed position and it shouldn't need readjustment just for a pedal swap but if the get disturbed they need to be pushed in toward the pedal untill they bottom out the plunger
when i do conversions i remove them (for better access room to upper nut) and unplug the brake lamp connector so the lamps aren't on the entire time i'm swapping out the pedal
for the press nut on the lower left stud a hose saver pulls them off pretty easy , also works nice topull the brake rod retainer clip
Excuse my ignorance, but what's a hose saver and what does it look like? Also, what do you do with the plug that's plugged into the brake switch? Since you delete that plug. Does it just hang? I feel a little out of my league here. I've owned the GN since 95 but I've never done anything to it until recently.
- Joined
- Aug 1, 2003
- Messages
- 9,769
the plugs from PM .. just push them under the wiper motor
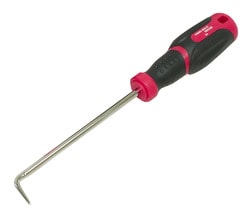
hose saver is a 90 degree pointed hook with a screwdriver handle end , , slides under a hose (usually radiator hoses ) to free from the outlets
hose saver is a 90 degree pointed hook with a screwdriver handle end , , slides under a hose (usually radiator hoses ) to free from the outlets
- Joined
- Aug 1, 2003
- Messages
- 9,769
novaderrik
Well-Known Member
- Joined
- May 12, 2004
- Messages
- 8,076
taking the steering column out so you can take the whole brake pedal bracket out would save a lot of aggravation under the dash...
i've never actually done this swap- i've replaced a few boosters and pedals in various cars over the years- but i think i could knock it out in a couple of hours...
i've never actually done this swap- i've replaced a few boosters and pedals in various cars over the years- but i think i could knock it out in a couple of hours...
What's a good way of doing that?brakes should not need to bled if the system was good before
the master needs to be bled before install and workout the bubbles ,then you just need to get the bubble out where the lines connect to the master
- Joined
- Aug 1, 2003
- Messages
- 9,769

- Joined
- Aug 1, 2003
- Messages
- 9,769
thats a charcoal filter ,used to prevent gasoline fumes (problem on carbed cars ) from getting to the rubber diaphragm in the booster and causing damage
the booster vac hose just connects to the new vacuum block brake port (use zips , clamps or crazy glue to prevent blow off under boost ),could even be teed into the pcv line but will have a little less vacuum. i prefer to tap a hose barb fitting into the plenum at the rear and leave the vacuum block alone
the booster vac hose just connects to the new vacuum block brake port (use zips , clamps or crazy glue to prevent blow off under boost ),could even be teed into the pcv line but will have a little less vacuum. i prefer to tap a hose barb fitting into the plenum at the rear and leave the vacuum block alone
I'm getting a new vacuum block, which looks like it has the port for the booster, but what would be a good spot on the intake if I didn't want to use the new block? Also, could i use the old vacuum block gasket for the new one? Idk what the new one looks like internally and if the old gasket would even work. Btw, I just replaced the gasket, so it's new.
Similar threads
7
1K
Online statistics
- Members online
- 23
- Guests online
- 4,287
- Total visitors
- 4,310
Totals may include hidden visitors.