Today I installed my Steadfast steering column guard and decided since no one else has done a write up on it, that I would.
Steadfast? What's that?
Ok...most of you may have never heard of a "Steadfast" collar. So what is it? What does it do? Why do you need one/want one? If you're asking any of these questions, read on.
As you probably already know, the GM G body cars (1978-1987 Cutlass, Regal, Monte Carlo, Grand Prix, Malibu, El Camino, etc.) are hot theft magnets and relatively easy to steal. In the past, several attempts at theft deterrents, namely "The Club", have proven ineffective against auto thefts. All a thief needs is a saw hidden underneath his clothes, he saws off the club of the steering wheel, and off he goes...in your car.
The Steadfast column collar helps prevent thieves from breaking open your steering column and gaining access to the critical parts of the steering column that are required to start the car without the key. The collar consists of 3 pieces of solid steel that wrap around the column. Two of the pieces totally encase the upper end of the column closest to the steering wheel while the third protects the driver side lower half of the column which also is a critical area.
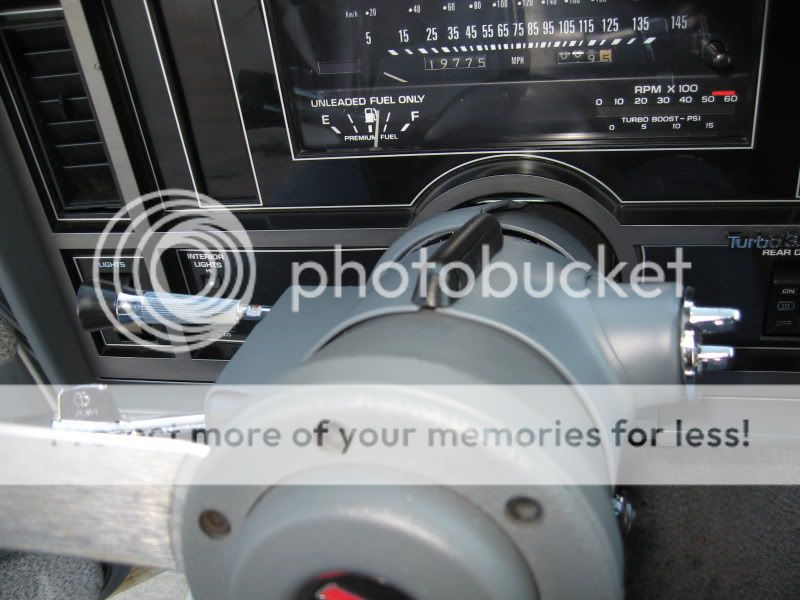
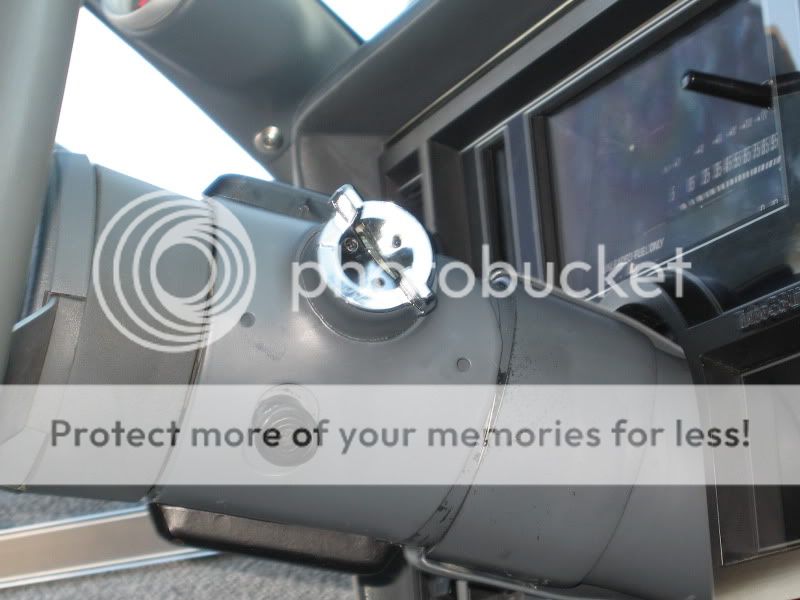
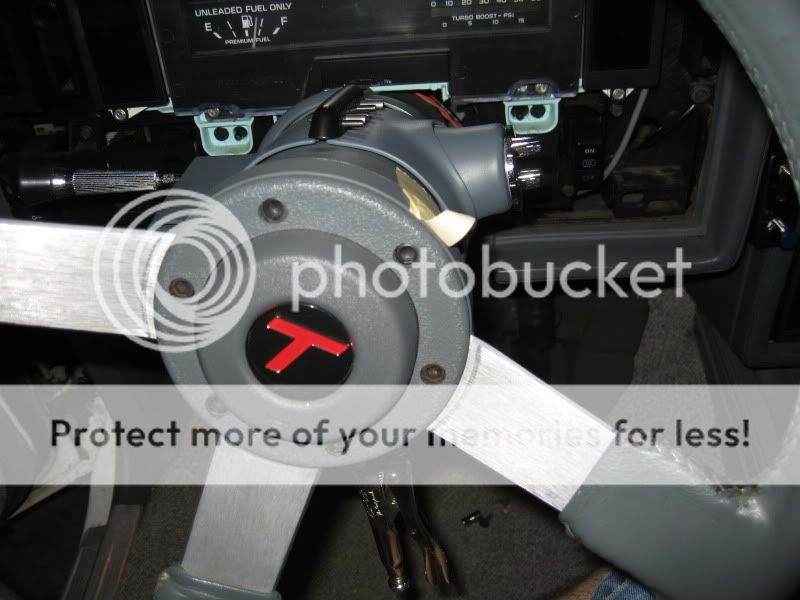
Here's a Steadfast column guard:

Steadfast claims this is a "hardened steel construction" that provides "permanent, continuous security" and even "qualifies for insurance discounts."
But what about other theft deterrants?
Yes there are other theft deterrents....you could get the "obnoxious over-rated often ignored by pedestrians" car alarm that goes off in 20 minute intervals every time a leaf falls on it. Which are practically useless today, especially when a stun gun to the car's body (was told this by a professional alarm installer) is all that's needed to blow the fuse in one and render them inoperative.
Or you could get the one theft deterrent one that allows you to remove the whole steering wheel and take it with you....but who wants the embarrassment and burden of carrying that big cumbersome steering wheel around when you leave your car? That's about as outdated as pull out car stereos. (anyone remember those?)
And then there's another column guard on the market that's much cheaper than the Steadfast but it's been proven also to be inefficient as it can be removed rather easily so I am told.
So now you're probably wondering "where can I get a Steadfast column collar for my car"? And "how much does it cost"? Well you can order them direct from Steadfast by going online to Auto Security Products then run your cursor over where it says "Steadfast" in the upper left hand corner, then scroll down to where it says "General Motors" then a 2nd box pops up just to the right to allow you to select which make of a GM vehicle you have.
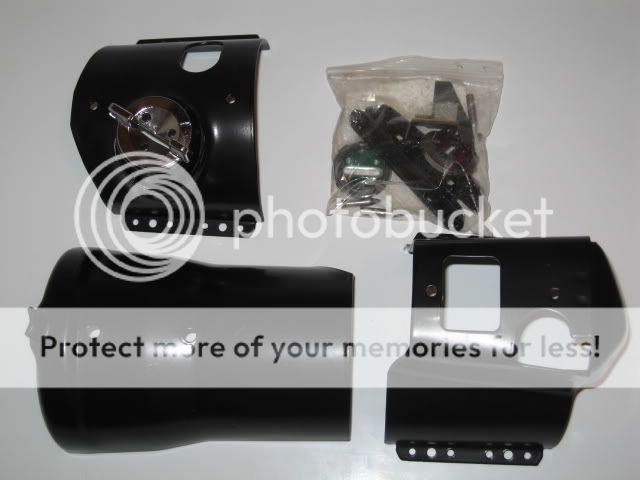
The collar for the G bodies is part number SGT0503. The collars come in your choice of 3 finishes: chrome, gold or black. They do not come in any other colors. As of the time this was typed, the black column collars were selling for $189. If you want to add a little "bling" to your column in the form of chrome or gold, plan on spending $249 instead.
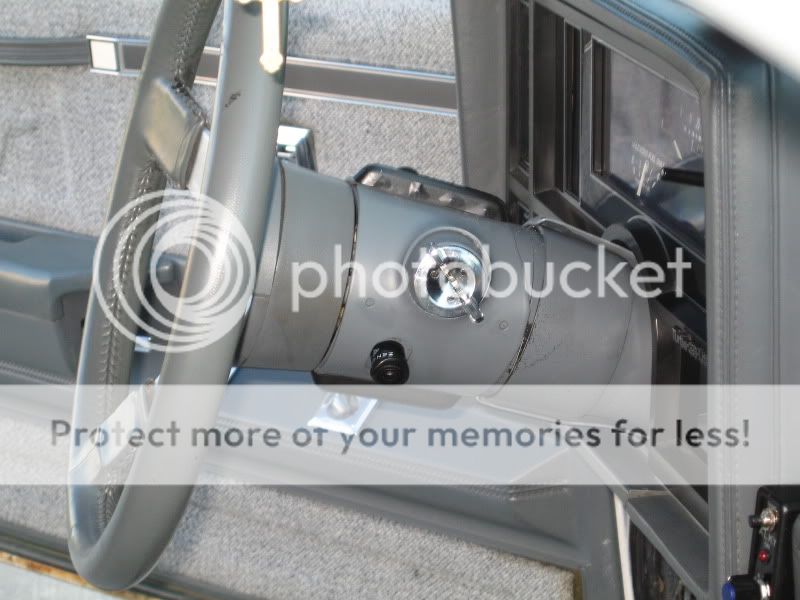
Here is my collar as it came out of the box:
Now, keep in mind this is not a 100% effective method to keeping thieves from stealing your car. It is however pretty much a permanent fix to someone busting open the steering column and messing with the vulnerable parts inside needed to start the car without the key and drive off with it. Once this steel collar is on, it's on there and next to impossible to remove. In fact, when installing it, what secures it together are nothing but 8 roll pins. That's right only 8 of them. And once they are driven in, they cannot be driven back out!
Prepping for install
Since my car is a gray interior and I wanted the collar to match, I ordered up a can of GN interior gray from Kirbans performance. It sells for $15.95 and it is part number 6822. It's a very close match to the factory gray that was used on the steering column from the factory. Kirban also carries the correct interior trim paints for T-type interiors that are blue or burgundy.
When the collar came out of the box, it had a new ignition lock cylinder cap that was secured on with screws. On the back side was some sort of lubricant used to keep it moving freely inside the stalk. If you plan on painting your collar, you will want to remove the cap and wash this area well with hot water and dish detergent to remove the lubricant.
After washing and allowing to air dry, I used some 220 grit sandpaper to roughen the surface of the original black paint. Then I washed the parts again to remove any sanding residue, then allowed the parts to air dry, then took them outside and shot the Kirbans gray paint directly over the sanded black. The paint sticks rather well and came out great. I did 2 coats total, allowing the first coat to almost dry before applying the second. After allowing the freshly painted parts to cure, it was time to do the install.
The install
To install the column collar, you will need some rubbing alcohol and a towel, a hammer, a flat blade screw driver, a few small punches, a few pairs of vise grips and some patience. A can of white grease is also helpful.
1. Remove the factory ignition cylinder cap. A flat blade screwdriver is what I used. Insert it between the cap and the stalk and turn clockwise. Repeat a few more times in different areas. The cap should pop out.
2. Remove the instrument panel bezel. It just pops off.
3. Remove the lower dash panel that contains the a/c vent that aims at the lower part of the drivers seat.
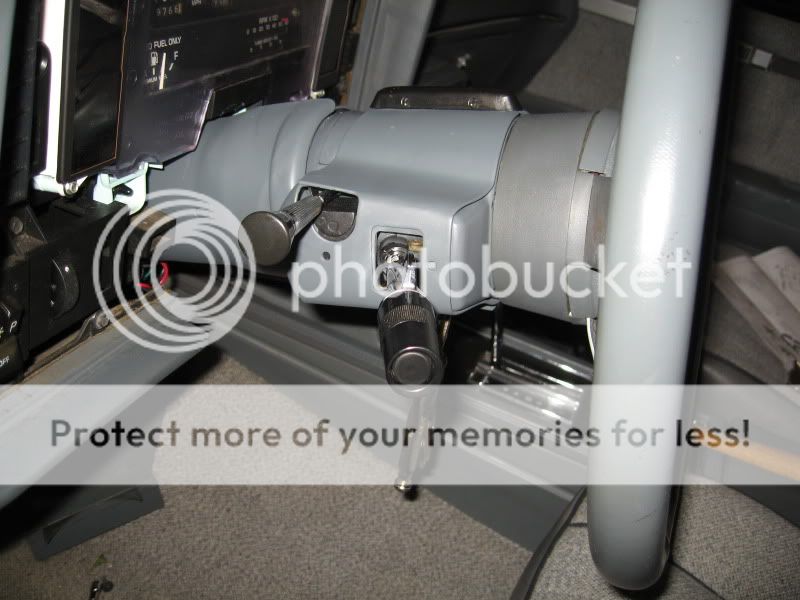
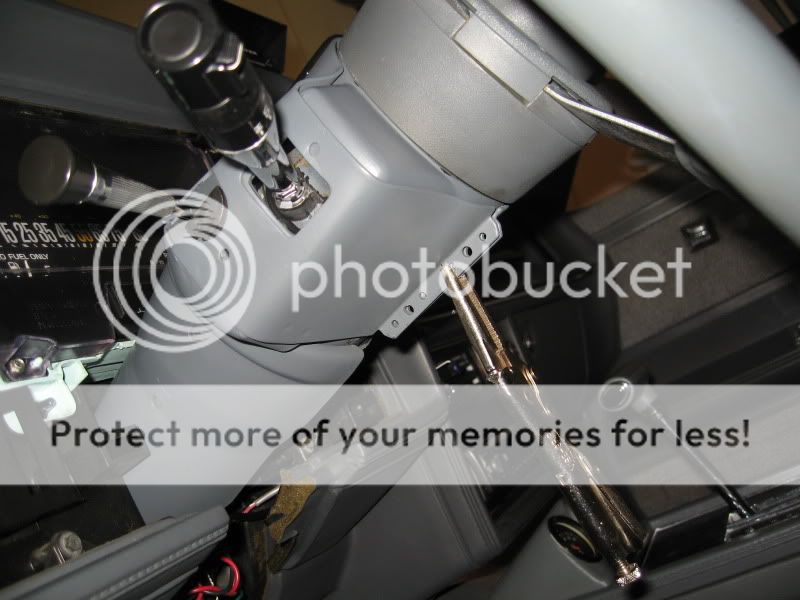
4. Take the alcohol and the towel and wipe down the area on top of the steering column just below the tilt wheel adjuster. Inside of the bag (in the picture) is a a bracket that will mount here. It's held on by double sided adhesive tape. You can see the bracket as it has a semi circle on it as seen under the tilt adjuster:
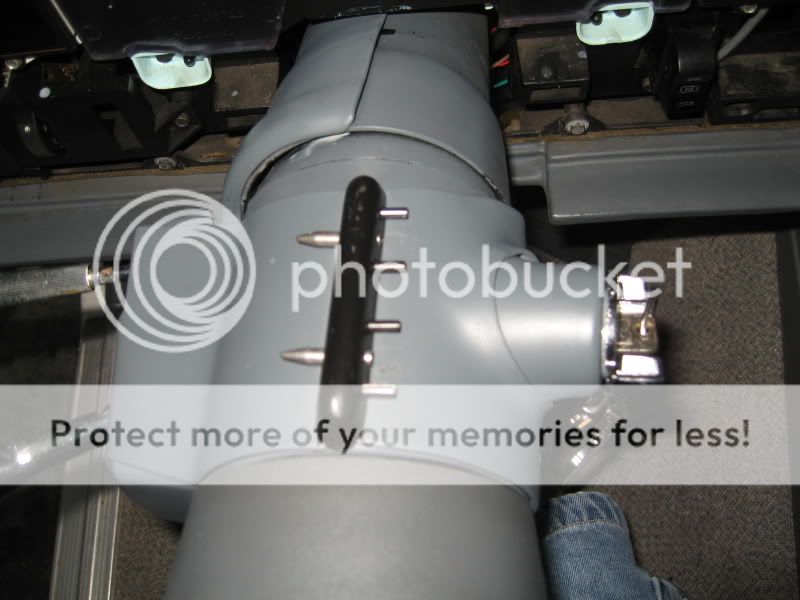
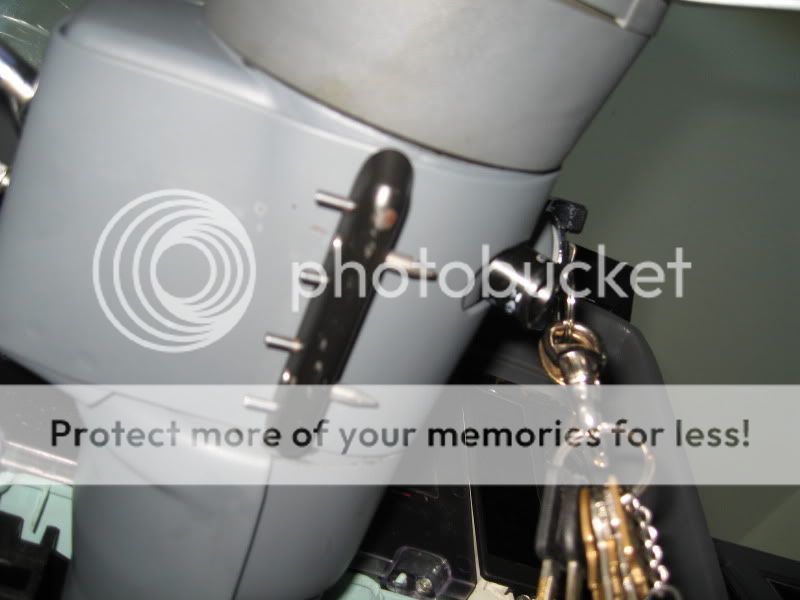
5. Take the shield and position it under the column, then turn a 1/4 turn so that it is on the drivers side of the steering column, facing the driver side door. The shield can be seen here as a half piece of round metal on the column where it meets the dash cluster:
6. While holding the shield, take the left collar housing on...it slips over both the turn signal and the tilt wheel adjuster. On the inside is a hole where the tab on the shield will fit into. This keeps the shield in place.
7. On the back of the instructions is where you will need to see which clutch you need. The clutch is the round piece of metal needed on the reverse side of the new ignition lock cap that comes with the kit. It has three tapped holes in it where the ignition cylinder cap will screw into.
On GM vehicles there's 3 colors that come with the kit....red, green and brass. The brass is for some GM cars 1980 and up, the red is for some GM cars 1986 and up and the green is for some GM cars 1991 and up. For some reason my 1987 Regal uses the green. Yours may vary.
Once you've selected your disc, then you will install it on the opposite side of the collar that has the ignition switch....and the ignition cap goes on the opposite side. You secure these two together with the 3 screws for the cap. When finished the cap should rotate freely in the collar. Now is the time to take a can of white grease and apply it on the inside so that cap does not bind up. I prefer the Super Tech brand white grease from Wal Mart as it semi solidifies once sprayed on. Of course I used Liquid Wrench which is just runny and messy but it was all I had at the time.
8. Now you can install the other half of the collar to the steering column. It may take some finesse to get it on. Before you do this, take a moment to mark where the lock position is on the column. Take a piece of masking tape and run it from where it says "lock" and bring it out to the steering wheel. (jiggle the wheel before you do this so it locks in place) Then remove the tape on the column but not on the wheel.
Now, the reason why you do this is because as you are mating the collar to the column, you must ensure the ignition cap is in the lock position. The collar, unlike the column, does not say "LOCK" on it. However there is a slit cut on the cap that when lined up with the tape, should be about in the lock position.
This is not the greatest pic but here's how I did my tape:
Once you have mated the collar to the column, jiggle the ignition cap to verify that it's seated inside the stalk correctly. If done right, you should not be able to turn it much and you should be able to look inside and see the key hole line up rather easily.
9. Now here's where things get interesting. You're now ready to join the flanges of the collar housings together. Let me say this now, this is a bit of a pain in the rear to do. You might come up with a few choice cuss words but rest assured it can be done.
Ok, if at all possible, squeeze the two top halves together by pushing inwards on the two collar halves. An assistant works great for this, I however worked alone. You may be able to do this with vice grips. I tried this and it didn't seem to work as well as I thought. I would get them close and as soon as I let off the vise grips they’d come apart. I eventually was able to get them close enough to get one of the clasps on. The clasps are what hold the two halves of the collar together. The kit comes with 2 of them. Here's a pic of the clasp, it's the black piece:
BTW, the clasps come painted black....I did not paint mine because I figured the paint would get chipped from driving in the pins plus they're so subtle it's not all that noticeable to me.
10. Once the top clasp is on, use a hammer to tap it on. Do it gently but don't baby it too much..it's a little bit of a challenge to get on. However once on there you will find there's 2 holes that are used for alignment. With the kit you get 8 alignment pins. (why 8 when there's 4 holes total, 2 per clasp I'll never know) What I like to do and found easy is to take one of my punches and get one of the holes lined up, then drive an alignment pin in on the other hole until it's partially thru. Then I'd pull out the punch and drive the other alignment pin in all the way. Then finish off the other side. NOTE: if you've painted your column collar, take great care not to damage your paint.
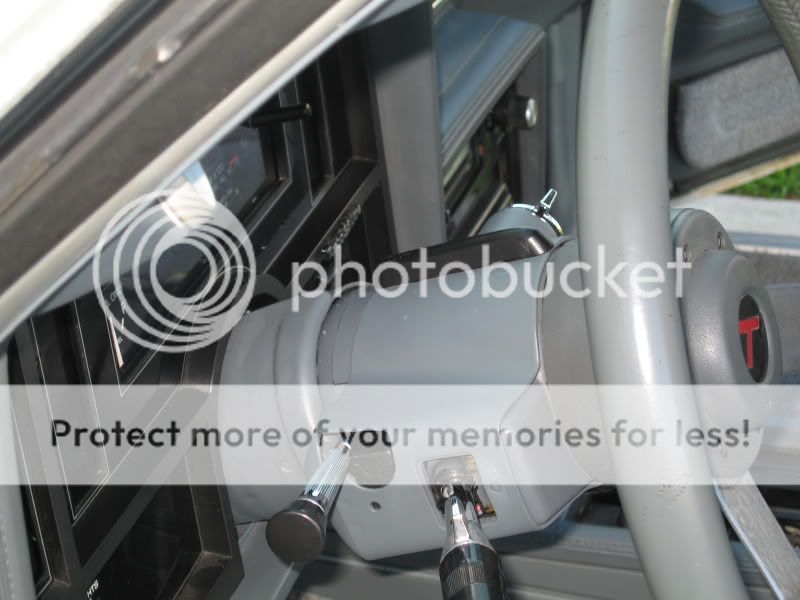
11. Now comes the even fun part....as you can see here:
The two bottom flanges aren't even remotely close together. Yes it's a PITA to get them mated together and on mine it actually looked like it would not go together, but with some help and the aid of some tools it can be done.
On this step, using a vise grip is pretty much mandatory.
Here's how I held the two halves together long enough to get the bottom clasp on. On the clasp I got one end started then let go of the vise grips (they really do get in the way when doing this) and hammered the rest of it on. Again after it was on I repeated the same thing on the bottom clasp as I had done the top: using a punch to align one hole and the pins to do the second to get it started, then driving home the other pin where the punch was.
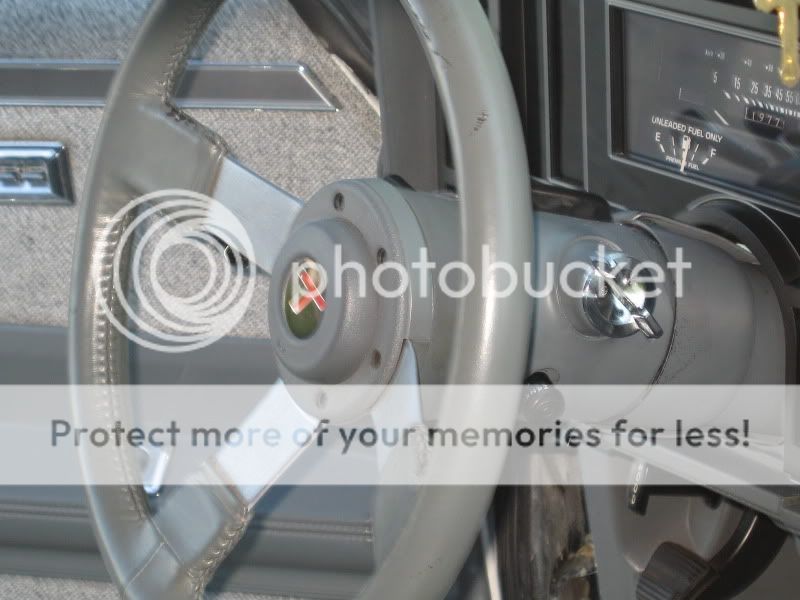
Your results should look something like this:
If you notice, the alignment pins are the silver spiked ones, and in this pic I have them fully driven in. They're only temporary and will eventually come back out.
Now, you want to check your ignition to make sure it moves freely in all positions. You also want to make sure your shifter moves freely thru all positions as well.
Now the reason I say this is because here's what I learned....
The key....first off if your ignition key has one of those plastic covers on it, the cover has to be cut away or the key won't fit. This is because now the key actually sits further inside of the ignition cap as it used to.
Which brings me to the next issue....get used to having to push your key in further. The first time I tried turning the key after the install, the silly thing would not move at all, as if the wrong key had been inserted. Until I realized I had to really push the key down into the cylinder. Again it's due to the new cap and how the collar actually relocates the cap a little farther from where it originally sat.
Make sure the lock cylinder cap and clutch moves freely. Mine had some binding issues that a little Liquid Wrench sprayed inside helped take care of.
Another issue you need to check for is...."how well does my car shift into gear?" I learned that on mine, the shield is right up against the part of the steering column that moves when you are shifting into gears. I don't know if I was the lucky guy to get the flawed unit or what. Both column shift and floor shifted models have this movable second part of the column. Shifting out of park to any gear is about normal, but now my shifter now takes a little more force to move it from 1st gear into park, to include any other gear along the way.
It does seem, however that the more I move the shifter the easier it gets. In a few weeks I'll undo the linkage to the transmission from the end of the steering column and move it up and down to help it get worked in, so I don't end up breaking the shifter cable from too much abuse that it's not designed for.
Those of you who have a floor shifted model and are not running the linkage from the column to the transmission (lockout linkage) or for those of you who run an aftermarket floor shifter, this is probably of no concern to you.
12. Finally when everything is good and you've rechecked everything 3 times over, drive in the 8 roll pins, alternating between the top and bottom clasps. Once the roll pins are in place, remove the alignment pins with a pin punch.
Then reinstall the lower panel that you removed earlier and the instrument cluster bezel. You're done.
I have yet to have installed the roll pins as there's a few last minute things I want to go over before then. Remember once the roll pins are in, they're in. They don't come back out.
I will post more pics as soon as I am completely finished.
Steadfast? What's that?
Ok...most of you may have never heard of a "Steadfast" collar. So what is it? What does it do? Why do you need one/want one? If you're asking any of these questions, read on.
As you probably already know, the GM G body cars (1978-1987 Cutlass, Regal, Monte Carlo, Grand Prix, Malibu, El Camino, etc.) are hot theft magnets and relatively easy to steal. In the past, several attempts at theft deterrents, namely "The Club", have proven ineffective against auto thefts. All a thief needs is a saw hidden underneath his clothes, he saws off the club of the steering wheel, and off he goes...in your car.
The Steadfast column collar helps prevent thieves from breaking open your steering column and gaining access to the critical parts of the steering column that are required to start the car without the key. The collar consists of 3 pieces of solid steel that wrap around the column. Two of the pieces totally encase the upper end of the column closest to the steering wheel while the third protects the driver side lower half of the column which also is a critical area.
Here's a Steadfast column guard:
Steadfast claims this is a "hardened steel construction" that provides "permanent, continuous security" and even "qualifies for insurance discounts."
But what about other theft deterrants?
Yes there are other theft deterrents....you could get the "obnoxious over-rated often ignored by pedestrians" car alarm that goes off in 20 minute intervals every time a leaf falls on it. Which are practically useless today, especially when a stun gun to the car's body (was told this by a professional alarm installer) is all that's needed to blow the fuse in one and render them inoperative.
Or you could get the one theft deterrent one that allows you to remove the whole steering wheel and take it with you....but who wants the embarrassment and burden of carrying that big cumbersome steering wheel around when you leave your car? That's about as outdated as pull out car stereos. (anyone remember those?)
And then there's another column guard on the market that's much cheaper than the Steadfast but it's been proven also to be inefficient as it can be removed rather easily so I am told.
So now you're probably wondering "where can I get a Steadfast column collar for my car"? And "how much does it cost"? Well you can order them direct from Steadfast by going online to Auto Security Products then run your cursor over where it says "Steadfast" in the upper left hand corner, then scroll down to where it says "General Motors" then a 2nd box pops up just to the right to allow you to select which make of a GM vehicle you have.
The collar for the G bodies is part number SGT0503. The collars come in your choice of 3 finishes: chrome, gold or black. They do not come in any other colors. As of the time this was typed, the black column collars were selling for $189. If you want to add a little "bling" to your column in the form of chrome or gold, plan on spending $249 instead.
Here is my collar as it came out of the box:
Now, keep in mind this is not a 100% effective method to keeping thieves from stealing your car. It is however pretty much a permanent fix to someone busting open the steering column and messing with the vulnerable parts inside needed to start the car without the key and drive off with it. Once this steel collar is on, it's on there and next to impossible to remove. In fact, when installing it, what secures it together are nothing but 8 roll pins. That's right only 8 of them. And once they are driven in, they cannot be driven back out!
Prepping for install
Since my car is a gray interior and I wanted the collar to match, I ordered up a can of GN interior gray from Kirbans performance. It sells for $15.95 and it is part number 6822. It's a very close match to the factory gray that was used on the steering column from the factory. Kirban also carries the correct interior trim paints for T-type interiors that are blue or burgundy.
When the collar came out of the box, it had a new ignition lock cylinder cap that was secured on with screws. On the back side was some sort of lubricant used to keep it moving freely inside the stalk. If you plan on painting your collar, you will want to remove the cap and wash this area well with hot water and dish detergent to remove the lubricant.
After washing and allowing to air dry, I used some 220 grit sandpaper to roughen the surface of the original black paint. Then I washed the parts again to remove any sanding residue, then allowed the parts to air dry, then took them outside and shot the Kirbans gray paint directly over the sanded black. The paint sticks rather well and came out great. I did 2 coats total, allowing the first coat to almost dry before applying the second. After allowing the freshly painted parts to cure, it was time to do the install.
The install
To install the column collar, you will need some rubbing alcohol and a towel, a hammer, a flat blade screw driver, a few small punches, a few pairs of vise grips and some patience. A can of white grease is also helpful.
1. Remove the factory ignition cylinder cap. A flat blade screwdriver is what I used. Insert it between the cap and the stalk and turn clockwise. Repeat a few more times in different areas. The cap should pop out.
2. Remove the instrument panel bezel. It just pops off.
3. Remove the lower dash panel that contains the a/c vent that aims at the lower part of the drivers seat.
4. Take the alcohol and the towel and wipe down the area on top of the steering column just below the tilt wheel adjuster. Inside of the bag (in the picture) is a a bracket that will mount here. It's held on by double sided adhesive tape. You can see the bracket as it has a semi circle on it as seen under the tilt adjuster:
5. Take the shield and position it under the column, then turn a 1/4 turn so that it is on the drivers side of the steering column, facing the driver side door. The shield can be seen here as a half piece of round metal on the column where it meets the dash cluster:
6. While holding the shield, take the left collar housing on...it slips over both the turn signal and the tilt wheel adjuster. On the inside is a hole where the tab on the shield will fit into. This keeps the shield in place.
7. On the back of the instructions is where you will need to see which clutch you need. The clutch is the round piece of metal needed on the reverse side of the new ignition lock cap that comes with the kit. It has three tapped holes in it where the ignition cylinder cap will screw into.
On GM vehicles there's 3 colors that come with the kit....red, green and brass. The brass is for some GM cars 1980 and up, the red is for some GM cars 1986 and up and the green is for some GM cars 1991 and up. For some reason my 1987 Regal uses the green. Yours may vary.
Once you've selected your disc, then you will install it on the opposite side of the collar that has the ignition switch....and the ignition cap goes on the opposite side. You secure these two together with the 3 screws for the cap. When finished the cap should rotate freely in the collar. Now is the time to take a can of white grease and apply it on the inside so that cap does not bind up. I prefer the Super Tech brand white grease from Wal Mart as it semi solidifies once sprayed on. Of course I used Liquid Wrench which is just runny and messy but it was all I had at the time.
8. Now you can install the other half of the collar to the steering column. It may take some finesse to get it on. Before you do this, take a moment to mark where the lock position is on the column. Take a piece of masking tape and run it from where it says "lock" and bring it out to the steering wheel. (jiggle the wheel before you do this so it locks in place) Then remove the tape on the column but not on the wheel.
Now, the reason why you do this is because as you are mating the collar to the column, you must ensure the ignition cap is in the lock position. The collar, unlike the column, does not say "LOCK" on it. However there is a slit cut on the cap that when lined up with the tape, should be about in the lock position.
This is not the greatest pic but here's how I did my tape:
Once you have mated the collar to the column, jiggle the ignition cap to verify that it's seated inside the stalk correctly. If done right, you should not be able to turn it much and you should be able to look inside and see the key hole line up rather easily.
9. Now here's where things get interesting. You're now ready to join the flanges of the collar housings together. Let me say this now, this is a bit of a pain in the rear to do. You might come up with a few choice cuss words but rest assured it can be done.
Ok, if at all possible, squeeze the two top halves together by pushing inwards on the two collar halves. An assistant works great for this, I however worked alone. You may be able to do this with vice grips. I tried this and it didn't seem to work as well as I thought. I would get them close and as soon as I let off the vise grips they’d come apart. I eventually was able to get them close enough to get one of the clasps on. The clasps are what hold the two halves of the collar together. The kit comes with 2 of them. Here's a pic of the clasp, it's the black piece:
BTW, the clasps come painted black....I did not paint mine because I figured the paint would get chipped from driving in the pins plus they're so subtle it's not all that noticeable to me.
10. Once the top clasp is on, use a hammer to tap it on. Do it gently but don't baby it too much..it's a little bit of a challenge to get on. However once on there you will find there's 2 holes that are used for alignment. With the kit you get 8 alignment pins. (why 8 when there's 4 holes total, 2 per clasp I'll never know) What I like to do and found easy is to take one of my punches and get one of the holes lined up, then drive an alignment pin in on the other hole until it's partially thru. Then I'd pull out the punch and drive the other alignment pin in all the way. Then finish off the other side. NOTE: if you've painted your column collar, take great care not to damage your paint.
11. Now comes the even fun part....as you can see here:
The two bottom flanges aren't even remotely close together. Yes it's a PITA to get them mated together and on mine it actually looked like it would not go together, but with some help and the aid of some tools it can be done.
On this step, using a vise grip is pretty much mandatory.
Here's how I held the two halves together long enough to get the bottom clasp on. On the clasp I got one end started then let go of the vise grips (they really do get in the way when doing this) and hammered the rest of it on. Again after it was on I repeated the same thing on the bottom clasp as I had done the top: using a punch to align one hole and the pins to do the second to get it started, then driving home the other pin where the punch was.
Your results should look something like this:
If you notice, the alignment pins are the silver spiked ones, and in this pic I have them fully driven in. They're only temporary and will eventually come back out.
Now, you want to check your ignition to make sure it moves freely in all positions. You also want to make sure your shifter moves freely thru all positions as well.
Now the reason I say this is because here's what I learned....
The key....first off if your ignition key has one of those plastic covers on it, the cover has to be cut away or the key won't fit. This is because now the key actually sits further inside of the ignition cap as it used to.
Which brings me to the next issue....get used to having to push your key in further. The first time I tried turning the key after the install, the silly thing would not move at all, as if the wrong key had been inserted. Until I realized I had to really push the key down into the cylinder. Again it's due to the new cap and how the collar actually relocates the cap a little farther from where it originally sat.
Make sure the lock cylinder cap and clutch moves freely. Mine had some binding issues that a little Liquid Wrench sprayed inside helped take care of.
Another issue you need to check for is...."how well does my car shift into gear?" I learned that on mine, the shield is right up against the part of the steering column that moves when you are shifting into gears. I don't know if I was the lucky guy to get the flawed unit or what. Both column shift and floor shifted models have this movable second part of the column. Shifting out of park to any gear is about normal, but now my shifter now takes a little more force to move it from 1st gear into park, to include any other gear along the way.
It does seem, however that the more I move the shifter the easier it gets. In a few weeks I'll undo the linkage to the transmission from the end of the steering column and move it up and down to help it get worked in, so I don't end up breaking the shifter cable from too much abuse that it's not designed for.
Those of you who have a floor shifted model and are not running the linkage from the column to the transmission (lockout linkage) or for those of you who run an aftermarket floor shifter, this is probably of no concern to you.
12. Finally when everything is good and you've rechecked everything 3 times over, drive in the 8 roll pins, alternating between the top and bottom clasps. Once the roll pins are in place, remove the alignment pins with a pin punch.
Then reinstall the lower panel that you removed earlier and the instrument cluster bezel. You're done.
I have yet to have installed the roll pins as there's a few last minute things I want to go over before then. Remember once the roll pins are in, they're in. They don't come back out.
I will post more pics as soon as I am completely finished.


 ).
).
")