Hello normster.
There are a few things that need to be looked at to make sure that all is well.
This might get long winded so I'll try to keep it short but can't promise anything.
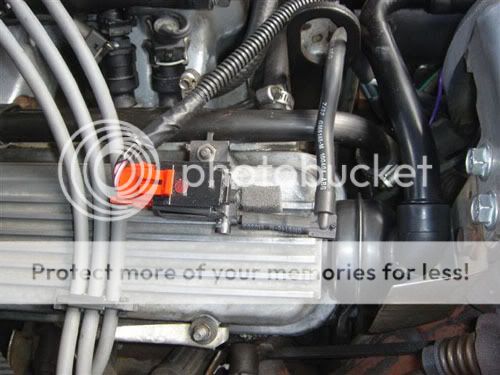
Here is a picture showing how the vacuum hoses are supposed to be hooked up on a stock turbo setup. Yes, it's a TA-49 turbo, but the hose routing is the same.
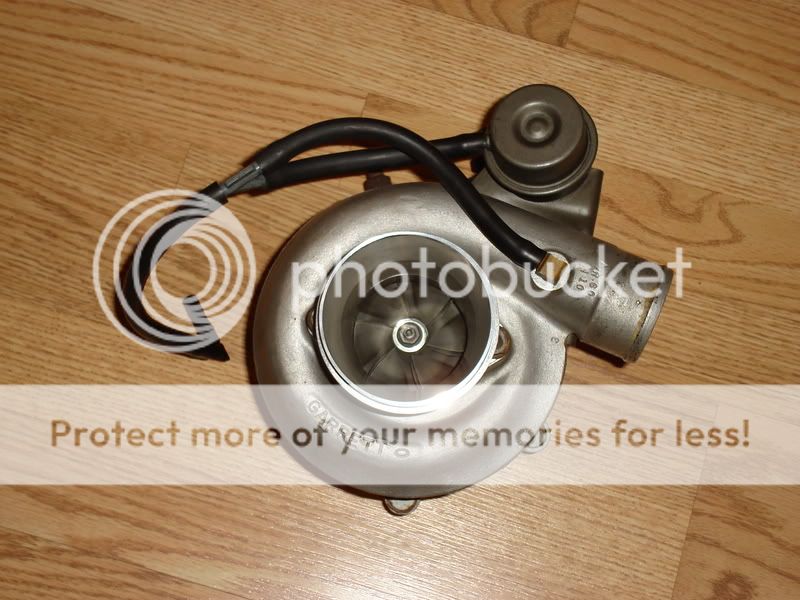
The end of the plastic 90* elbow hooks to the left port of the wastegate actuator that is located on one of the passengers side front valve cover studs. Here is a picture of the wastegate actuator showing the proper port that, that hose hooks too.
If the car is 100% stock as far as the vacuum hoses are concerned, check these first. The next thing I would check would be for signs of a blown or split intercooler hose. There are 3, one that connects the turbo to the intercooler, one that connects the intercooler to the up pipe, and the last one that connects the up pipe to the t-body. Typically you would have some very erratic driving issues if you blow one of these off, but if a hose has a crack, it could behave as you are saying. Next, we need to check the hose between the MAF sensor and the turbos inlet bell for signs of holes or tears. If it checks out to be good, then I would remove the inlet hose and using a flash light and a small mirror, inspect the compressor wheel for signs of FOD damage, chipped or missing blades. If it looks like something got sucked in and all of the fins are damaged or fins are missing, then the turbo is shot and will need to be rebuilt or replaced. Also, make sure that the compressor nut is still attached to the compressor wheel. I have seen instances where the nut has come off and the compressor wheel is just free wheeling and bouncing around inside the compressor housing. If this is the case, it's probably toast. If everything else checks out sound except the turbo, you will need to remove it and have it repaired.
Also, if the turbo is shot, do yourself a huge favor and do these next two steps. Completely remove the oil filter adapter that has the oil lines that run to the radiators internal oil cooler. Once the oil filter is off, you will see the nut that the filter screws onto. Remove that nut and the filter adapter will come right off. Make darn sure you remove the O-ring from the oil pump housing if it sticks. Disconnect the oil lines from the radiator and cap them off.
In it's place, I would highly recommend you purchase one of Precisions Oil Filtration Kits and install it. And here's why. Depending on how much FOD or foreign object damage has made it's way not only through the turbo, but now, into your motor and oil, these fine shavings and or particles will tend to get trapped inside the factory oil cooler. There is no 100% perfect way to completely flush the factory oil cooler. These particles will slowly leach their way back into your oil system and eventually lead to another turbo failure and or engine bearing failure. This is very common with these cars and the oiling system that they have from the factory. These are issues that need to be addressed whenever things happen like a blown turbo, blown head gaskets, wiped cam lobe, broken timing chain, basically any internal component failure.
Once you have the PTE Oil Filtration system installed, you will see that it comes with a new turbo oil feed line that replaces and blocks off the factory oil feed line. This is a good thing because it now provides the turbo with a source of filtered oil where as the factory setup sends unfiltered oil directly to the turbo. The last thing you will need to do, would be to remove the intercooler. Flush it out with a good and strong degreaser many many times. If the car is 100% stock, there is a hose/tube assembly that connects from the passengers side valve cover to the inlet bell of the turbo. This was Buicks way of helping to control crank case ventilation and emissions. The downside is, the turbo sucks oil straight into the intercooler and over time the intercooler will fill up full of oil. This will show itself in the form of oil soaked intercooler hoses, oil on the inside of the inlet pipe, oil in the throttle body and all inside the intake. This is also one reason GM designed and sold a kit called Top Engine Cleaner. It's purpose was to help flush all of the oil residue out of the top of the engine. If the hoses, inlet pipe and throttle body have the appearance of the Exxon Valdeze I would recommend you either clean the throttle body and plenum the best way possible, or get one of the Top Engine Cleaner kits from your local GM Parts Dept.
Before you take anything apart or attempt to tackle this job if you've never worked on one of these cars, it can seem like a very daunting task. If you have good mechanicing skills, don't let it bother you, these cars are simple once you get the hang of where everything is. Over time, the more you work on them you will start to remember everything about them by heart. What size wrench to use on what bolt, etc etc. I've always found that it's best to use a digital camera and take many many pictures of everything. The turbo removal is not that hard to do, but I would recommend using a penetrating oil such as PB Blaster or WD-40 to help loosen the 3 bolts at the header, the factory oil feed line, the 2 spring loaded downpipe bolts and the 4 bolts on the downpipe elbow. Especially if this is a stock car with high mileage. In a nut shell it goes something like this, Heatshield has 6 bolts, 13mm, now spray the 3 bolts on the header to turbo flange and the downpipe elbow. Using a small flat blade screw driver or small tipped needle nose pliers, remove the Oh Jesus clip that retains the actuator arm onto the swing valve. I call it that, cause that's what you say when it goes flying across the garage never to be seen again. Try to catch it when it pops off, if not don't swet it, we have the technology and we will make it better. If your wastegate actuator is adjustable, take a measurement of the arm length when the actuator is at rest. This is important during your re-installation. If it's non adjustable, no problem.
Remove the the 2 spring loaded bolts, pull the downpipe out of the elbow along with the dough nut gasket. Now take the 4 bolts out of the elbow making sure to keep all your bolts and hardware in large freezer bags that are labeled with a permanent marker. Myself in the beginning I would have one bag for turbo, one for intercooler, etc etc. Now, take the MAF hose off the inlet bell of the turbo, remove the valve cover hose/tube assembly and valve cover breather and set them aside. Unscrew the worm clamps on the turbo to intercooler hose, taking the clamps off and sliding the hose further onto the intercooler. Remove the vacuum hose from the wastegate solenoid. You might see a small foam filter on the other port of the wastegate actuator, use care not to disturb it as they have a tendancy to pop off and disappear into never never land. The oil return flex tube is bolted to the bottom of the turbo with two bolts that I believe are 10mm. Be careful when taking these off as we don't want to tweak the flexible drain tube too much as doing so can cause the thin walled flex tubing to develope a crack which can lead to a huge oil leak. You just want to push it down far enough out of the way so that it doesn't interfere with turbo removal. The gasket might be stuck, if so, I've used a small blade screw driver to help pry the flange away from the bearing housing before removing the two bolts completely. Now, using a line wrench carefully break the oil feed line loose from the 90* brass fitting on the top of the bearing housing of the turbo. The oil feed line is a tapered flared line that screws into the brass fitting. Once it is disconnected, now we concentrate on the 3 bolts. I believe they are 15mm stud/nut combination, using a box end wrench loosen the bolts. They may be stubborn and you might have to use the double wrench method. If they don't come loose at first, spray them down with more penetrating oil and let it soak in. If this is the case, then let's move on to the dog ear bracket and question mark/heat shield bracket. The heat shield bracket is bolted to the dog eared bracket with two 13mm nuts on the inside of the curved portion of the bracket. Remove these two nuts. Now, the question mark/heat shield bracket is bolted to the front of the motor with two 15mm headed bolts. Located just underneath the valve cover breather on the front of the head you will see them. One is just the bolt by itself, the other has the battery ground attached to it. This is very,
very important to remember to reinstall this ground as it is the main ground to the engine. I always use three 6" 3/8 drive extentions with a deep 15mm socket for removal. Once these two bolts are out, the question mark bracket should pull straight up and out. Now the only thing left holding the turbo in place are the 3 header to turbine housing bolts. Don't swet it if the stud comes out or if just the nut comes off. When you get the turbo back from repair or installing a new one, it will have the proper studs. Unfortunately, PTE does not provide you with new nuts. Not sure if Limit Engineering or Cotton does either, but that's not that big a deal as they are available at your local Ace Hardware store. Once these 3 stud/nuts are removed, the turbo should be able to be rotated up and out of the intercooler hose and pulled straight up and away from the motor. There, not that bad now was it? Now is a good time to install a new O2 sensor as it's right there and easily accessed.
Now for the intercooler. The intercooler is held in place by two brackets and four 10mm headed bolts. Jack the car up and put it on jack stands high enough to easily access the IC shroud and enough so that you can pull it down under the car. Remove the 16 small screws that attach the plastic shroud to the intercooler. They are either 9/32 or 7mm can't remember which. Put them in a bag.
")
Pull the plastic shroud away from the intercooler and take it off. On the passengers side of the intercooler you will see the pan bracket that bolts to the bottom and side of the intercooler. Remove the one 10mm headed bolt that bolts the pan bracket to the bottom of the intercooler. Now, jack the car back down on the ground. Remove the two 10mm headed bolts on the passengers side of the intercooler. Now, while holding onto the neck of the intercooler, remove the 10mm headed bolt on the drivers side V bracket. It may be necessary to move the intercooler around to facilitate taking the bolt out easier. Now that these 4 bolts are out, the only thing that should be holding the intercooler should be the inlet pipes hoses and clamps. With someone helping to hold the intercooler (keeping it from falling down and hitting the ground) loosen the hose clamps and pull the inlet pipe off the throttle body. The intercooler at this point should just pull straight up and out of the engine bay.
Time to flush it out. I always had the best luck with Castrols Purple cleaner, but Simple Green will also work. The trick is to pour in just enough to help break down the sludge inside the IC, now fill it up half way with water just so the the core is full. Swish it around really good, then dump it. Now repeat as many times as needed until you don't have to add any degreaser and you're only using water. Once the water is clear, dump out the water and shake the IC as thoroughly as possible to help get the rest out. Now, turn the IC upside down and prop it against a wall in direct sunlight at an angle so that the water will further drain out, as well as heat up the IC core and evaporate the water. I would typically let my IC sit for 4-5 hours using this poor mans method. The other method would be to use compressed air and blow out the IC as best a possible, and still let it air dry.
Did you remember to take pictures before you started for your re-installation? Don't worry, the inlet pipe will only go on one way, and the heat shield bracket is the same.
Put it all back together in reverse order.
Here's a few tips.
When putting the intercooler back on, it's best to not have the inlet pipe on the intercooler, you will support the intercooler by holding onto the neck and moving it around enough so that you can finger thread the one 10mm bolt into the V bracket on the drivers side first. Then do the other 3 bolts on the pan bracket on the passengers side. Now do the inlet pipe, hoses and clamps. This is the perfect opportunity to replace old and worn out stock hoses with new hoses and t-bolt clamps. Install the shroud last, also, if your shroud still has the trash mesh screen in it, take it out as it restricts air flow to the intercooler. Install the new intercooler to turbo hose but push it as far on the intercooler as you can. This will help the turbo clear when you install it. Now re-install the inlet pipe, your new hoses and new t-bolt clamps.

When installing the new turbo, it's best to use the new oil drain gasket that comes with the turbo and use a thin coating of high temp copper silicone on both sides of the gasket. Set the turbo onto the header via the 3 studs and loosely tighten the nuts to keep the turbo from falling off the header. Now, install the oil drain flex tube. It maybe necessary to pull the turbo up slightly so that you can gain better access to those two bolts. Once the oil drain flex tube is installed, using caution not to move it around and or tweak it very much (remember the cracking precaution during removal) now you can semi hand tighten the 3 nuts on the header. I like to snug them up just enough so that the turbo can still be moved with slight pressure. Having this slight movement will help you when installing the downpipe elbow/downpipe. Now, install the downpipe elbow. I recommend you replace the stock bolts with new Stainless Steel bolts that are the same length. Thread size is M8 x 1.25 thread. Use anti seeze on all of the bolts as I'm sure it won't be long until you replace the stock downpipe elbow with a nice 3" downpipe. Once the bolts are tightened, install the 2 spring loaded bolts and downpipe making sure not to forget the dough nut gasket. It only goes on one way. Tighten those two bolts up evenly, if not done evenly it can cause the downpipe to be tweaked and can cause a leak. Now that the downpipe is done, install the oil feed line and tighten it up. Install the new MAF pipe or hose or cold air kit that you picked up when gift shopping for your car.
Install your new K&N valve cover breather that you also picked up while shopping and install the plug on the inlet bell with either a zip tie or a hose clamp.
At this point you re-install the wastegate actuator arm onto the swing valve. If you lost the O Jesus clip during removal, there are a couple of replacement choices. You can use an alligator electrical test clip available at any auto parts store, or you can purchase the same throttle body cable and cruise control cable round clips and it will work as well. Make sure your wastegate actuator arm is adjusted to the same length as when you removed the turbo. Making sure to tighten up the set screw once it's set to length. It may be necessary to clock the compressor cover down slightly in order to line up the compressor cover discharge with the intercooler hose, as well as getting the wastegate actuator arm to line up. You simply loosen the compressor cover backing plate bolts and carefully tap the housing down or up depending on which direction is needed until the hose is perfectly straight. Hand tighten the compressor cover backing plate bolts up in a criss cross fashion. Now, pull the intercooler hose onto the turbo. Install and tighten up the t-bolt clamps/clamps.
You can either run the hoses back to the wastegate solenoid in factory configuration with the plastic grey Y, or you can install your newly aquired RJC boost controller and not have any hoses run to the solenoid and eliminate the plastic Y.
See photo.
The top hose on the RJC controller runs down and hooks up to the wastegate actuator. Make sure to zip tie all your new hose connections. Install the heat shield question mark bracket with the two 15mm bolts, the one bolt on the bottom is the one that the battery ground cable connects to. Very important remember? Tighten up the dog ear clamp bolts/nuts. Leave the heat shield off at first as we need to check for leaks on initial startup. Double check that everything is hooked back up and you have no extra bolts.
If you purchased the oil fitration kit from PTE, make sure the filter is full of oil and that the one line that connects to the filter housing has oil in it as well. If everything looks good, disconnect the orange wire behind the battery and spin the motor over a for a few seconds. This will help prime the oil pump. Connect the orange wire and start her up. Now check for leaks. Fix em if you have any. Make sure you have oil pressure. Either by aftermarket gauge or making sure the idiot light on the dash goes out. If all is well, let the car cool down to the touch and install the turbo heat shield. I personally only use the front two bolts that connect the turbo heat shield to the bracket, leaving off the back 4 as they are such a pain to mess with. If you installed a new 3" downpipe at the same time, you will need to trim the heat shield in order to clear the 3" pipe.
Enjoy your new turbo.
But in your case normster, I hope it's something simple and not the turbo.
Sorry this was so long, I got a bad habit about getting long winded.
Hope this helps a little.
Patrick

 BTW, it's not an adjustable wastegate.