Cruz 12-1 crank trigger on ECUGN

Welcome!

By registering with us, you'll be able to discuss, share and private message with other members of our community.

SignUp Now!

BEATAV8

The Engine Whisperer
TurboBuick.Com Supporter!
Joined
Feb 14, 2002
Messages
5,805
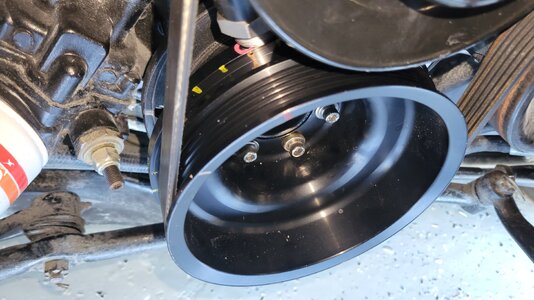
We installed and set up one of the new Cruz 12-1 crank trigger setups on an ECUGN car this past weekend. Excellent results so far. Still gotta take the car out on the road an rough it up a bit. Starts up super quick.
Thanks Bob & Eric for all the help, and Thanks Mr. Cruz for making new stuff for these old cars.

cruz pulley 0deg.jpeg


cruz pulley running.png
 

Attachments

  • composite log.jpg
    composite log.jpg
    4.3 KB · Views: 58
Is that a bhj balancer? When you set it up 60 degrees btdc did the crank sensor align with the red mark on the pulley? Mine didn't and I am not close to starting the car yet just wondering if the measurements Cruze gives is just to put it in the ballpark.
 
Is that a bhj balancer? When you set it up 60 degrees btdc did the crank sensor align with the red mark on the pulley? Mine didn't and I am not close to starting the car yet just wondering if the measurements Cruze gives is just to put it in the ballpark.
Yes, BHJ.
For the ECUGN we actually set it up using 60 ATDC#1, which also happens to be 60 BTDC#6.

The reason for this is that the ECUGN is configured for cylinder 6 internally. It's all about cylinder #6 with the ECUGN.

The photo above shows TDC#1. Set your timing indicator to 0 degrees and bolt up your pulley so it looks like this one.

From here if you rotate the crank clockwise to magnet#1 (magnet#1 is to the left of the red mark) you should be showing very close to 50 ATDC#1, which is coincidentally 70 BTDC#6. In the calibration set tooth #1 angle to 70 degrees because magnet #1 is coming in a 70 degrees BTDC#6.

The next part is setting the cam sensor. Stock is 25 ATDC#1 compression. You will want to advance it to 30 BTDC#1 compression so it comes in ahead of magnet#11. It's important that it comes in before magnet#11 and not after magnet#11 (in the gap!). 30 BTDC#1 is good but you could go more and still be perfectly good. Check it using a casper tool and also check it using the composite logger while cranking.

I posted more detail about it over on the turbotweak forum.
 
Yes, BHJ.
For the ECUGN we actually set it up using 60 ATDC#1, which also happens to be 60 BTDC#6.

The reason for this is that the ECUGN is configured for cylinder 6 internally. It's all about cylinder #6 with the ECUGN.

The photo above shows TDC#1. Set your timing indicator to 0 degrees and bolt up your pulley so it looks like this one.

......
The sensor timing and cylinder configuration of the ecuGN were designed to be like the stock ECM so that the stock cam sensor timing would be valid without having to compensate in the tune with strange values. (The stock ECM syncs on #6)

But like Steve says, set the engine to TDC, install the pulley so it looks like the picture, turn the cam sensor 1/8 of a turn CCW (or use his more precise method) and set up the tune for the new hardware.

The TurboTweak forum has some more in-depth details.

Bob
 
OK, so I'm really late to the game on this post, but I'm now trying to set up a Cruz Performance crank trigger on my GN, again with the ECUGN as you have, only I'm running the stock balancer. I assume my setup should follow the same "indexed to #6 cylinder" as you have described? Any differences that I need to know for a stock balancer? TIA.......
 
OK, so I'm really late to the game on this post, but I'm now trying to set up a Cruz Performance crank trigger on my GN, again with the ECUGN as you have, only I'm running the stock balancer. I assume my setup should follow the same "indexed to #6 cylinder" as you have described? Any differences that I need to know for a stock balancer? TIA.......
This installation process has been refined & dialed in now. Take a picture of your pulley installed (balancer at TDC#1) and I can tell you what your reference angle is.
Put the engine at TDC#1 and install your pulley with the red mark as close as it can be to the new sensor. The newest "stock balancer" style 6 bolt pulleys from Don will bolt up with the red mark almost directly under the new sensor. This puts the index angle at very close to 90 degrees (angle between magnet #11 and cylinder #6).

If the red mark is to the right of the sensor, the angle is more, usually 105 degrees. There are some of these pulleys out there but the newer ones are 90 degrees. There aren't many out there with less than 90 degrees (like the one pictured earlier in this thread)

From there you can fire up and check the timing with a timing light to see how much it needs to be tweaked to get your timing spot on. Then you can adjust your cam sensor.
 
This one is 105 degrees. Note red mark is to the right of the sensor.

04FC8614-7662-4FFA-B20B-211B0E5F70B2.jpeg
 
Back
Top