Swapped to a 4L80E
- Thread starter Otto J
- Start date
Welcome!
By registering with us, you'll be able to discuss, share and private message with other members of our community.
SignUp Now!You are using an out of date browser. It may not display this or other websites correctly.
You should upgrade or use an alternative browser.
You should upgrade or use an alternative browser.
That was his first build, I believe. A hot-street style setup. He did several more over the years. The build for the 1000hp twin turbo 5.3 is more race oriented. Lots of good data and Ryan is a cool guy.For those diy types and those who just want to know what is going on inside. This guy does some pretty good(GREAT) vids on the 4l80e and his swaps. He does some Jakes parts and such. His Ranger ain't no slouch and is driven to/from his track. if you do some watching he had a Mustang that could lay down some numbers too, all built in his garage.
My trans build is as follows.
97 2WD with slip yoke
Borg Warner HE frictions (these are the stock GM material), Raybestos regular steels
stock mechanical build other than rollerized rear thrust
replaced overdrive carrier, original one was worn
set low/reverse band 1 step tighter than stock using tool
internal dual feed, block both case (cup plug) and center support (set screw)
HD2 kit using new standard plate , drill .093 .110 .093 .110, all checkballs (Torlon) installed, no pressure relief
ream AFL valve
install TCC fixer valve
install "long" stator support bushing and ream to size
install Speedo-cable modded tailshaft housing (ebay)
install Sonnax retrofit (shorter) shift shaft.
install new internal harness
install stock pan, reuse original gasket
Overall a fairly basic build.
Bob
TexasT
Texas, Where are you from
- Joined
- Sep 10, 2002
- Messages
- 7,209
So, this little project has peaked my interest. What was used to get the 4l80e chevy bell to the Buick engine pattern? I see mentioned an adapter plate, and ultra bell. Did some searching and didn't see anything for a 4l80e to a bop pattern. J.W and Reid don't list anything like that. They have stuff for a th400 but I don't know if that is the same pump bolt pattern as a 4l80e. I ran a 700r4 for quite a while early on until my local guy(me) assembled a 2004r. But as above the 4l80e seems like a next step in the action. Especially if stepping up to an aftermarket ecu.
Moving the crossmember isn't too much and having a driveshaft cut is easy.
Keep up the great work. Looking fwd to some pix of the install.
Moving the crossmember isn't too much and having a driveshaft cut is easy.
Keep up the great work. Looking fwd to some pix of the install.
This is the adapter I have:
TCI 230001 BOP Engine to Chevrolet Transmission Adapter
There is also a trans-dapt adapter if I remember.
On the bellhousing, I found this, 4L80E SFI BELLHOUSING ADAPTER PACKAGE
I think this adapts the OEM trans to the Reid bell. But I'm not sure. I thought the Reid stuff was dual pattern, but i don't see it on their site.
Bob
- Joined
- May 28, 2001
- Messages
- 16,813
That adapter shows no availablity.
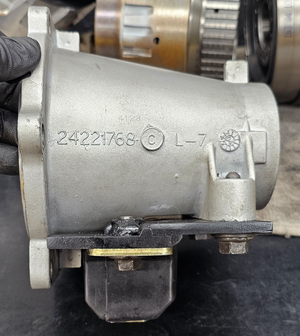
I don't have a Buick case/block to look at, gut I do have the 80E case.
I'm thinking some of the other adapters might work??
Maybe a mod needed?
I don't have a Buick case/block to look at, gut I do have the 80E case.
I'm thinking some of the other adapters might work??
Maybe a mod needed?
This one is in stock https://www.summitracing.com/parts/trd-0061
its a little thicker, so it would take thicker torque converter spacers.
Not sure how long the TCI unit is backordered.
Bob
its a little thicker, so it would take thicker torque converter spacers.
Not sure how long the TCI unit is backordered.
Bob
Turbo1dr
9 Sec Wanna-Be
- Joined
- May 25, 2001
- Messages
- 2,442
I'm in the process of doing the swap too. Here's how I done the shift linkage for a column shifter.

- Joined
- May 28, 2001
- Messages
- 16,813
Bob, that rear mount looks like the one I did.Thats really cool. Any details on the driveshaft or rear mount ?
I know its in a Malibu, not sure how different it will be to the TR's
Bob
Turbo1dr
9 Sec Wanna-Be
- Joined
- May 25, 2001
- Messages
- 2,442
The trans mount holes did fall on top of the cross member but not exactly in the middle.very similar, but it looks like his the trans mounting points are falling in front of the crossmember, yours were above it I believe.
Might be an illusion due to camera angle..
Bob
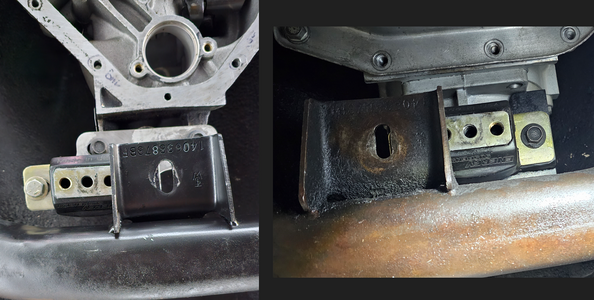
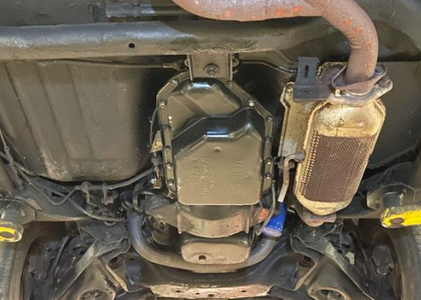
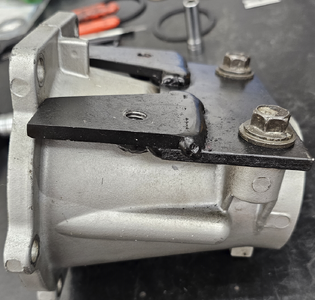
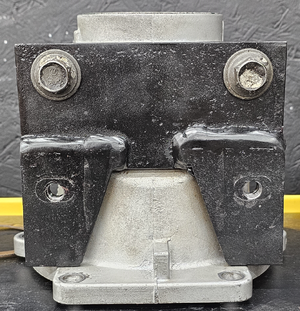
As far as the bracket I fabbed up...it's a V shaped bracket like the one that Chuck made. It seemed like it was the easiest way to get the factory crossmember to work. I had to cut off the original crossmember mounting pad on the V6 200-4R crossmember and rewelded it in the spot for the 4L80E. The V8 G-Bodies had a centered mount pad instead of the offset pad like the V6 cars. The Oldsmobile 307/200-4R V8 crossmember comes to mind. (picture attached)
CLICK -----> I was tempted to buy this bracket for LS swaps. But, I didn't know how high it would make the trans sit. The band anchor bulge hits the floor pan if it sits too high on the mount. Everything else is fine.
I bought a drive shaft from Precision Shaft Technologies. I put the trans yoke in it and pulled it back 1" and then measured from the center of the u-joint to the center of the rear end u-joint to get the length I needed. Mine come up to exactly 48" - center to center.
Attachments
that adapter bracket you linked is designed for this crossmember (intended for LS swaps)

 www.scramspeed.com
but it does look in the pics that its high enough on the passenger side for our usual exhaust setup.
other off-the-shelf crossmembers may not be high enough there (ICEMAN, G-FORCE, etc..)
The Hooker setup may be the easiest, bolt-in, no-fab solution (so far, anyway)
any thoughts about an offset adapter plate that wouldn't require moving the tab?
Bob
HOOKER TRANSMISSION CROSSMEMBER Magnum Transmission Crossmember
Looking for a quality speed shop near Illinois, contact Scram Speed. We do engine swaps, performance installations and consulting. Great Price. Fast Shipping. Call today!
but it does look in the pics that its high enough on the passenger side for our usual exhaust setup.
other off-the-shelf crossmembers may not be high enough there (ICEMAN, G-FORCE, etc..)
The Hooker setup may be the easiest, bolt-in, no-fab solution (so far, anyway)
any thoughts about an offset adapter plate that wouldn't require moving the tab?
Bob
Thats a very fancy driveshaft. I'm planning a plain vanilla one.
Drivetrain Specialists is local to me. So I will likely go with them, although all the driveshaft companies will ship,
I will post details, pics, and specs as soon as they are known. (this week I think)
Bob
Drivetrain Specialists is local to me. So I will likely go with them, although all the driveshaft companies will ship,
I will post details, pics, and specs as soon as they are known. (this week I think)
Bob
Turbo1dr
9 Sec Wanna-Be
- Joined
- May 25, 2001
- Messages
- 2,442
any thoughts about an offset adapter plate that wouldn't require moving the tab?
Bob
An offset mount was a consideration but when I got to looking at it, one of the bolt holes for the rubber mount would wind up directly underneath the extension housing. You would need a thick offset bracket so you'd have enough threads to get the rubber mount bolted on. Since there's limited room in the tunnel, I didn't want to have a thick bracket which would make the trans sit even higher and possibly hitting the tunnel.
I am also planning to add some additional tabs to the bracket so the two lower housing bolts will also hold it.
Attachments
In the search for a bolt-in crossmember, from what I see (in the pics) and read (here and elsewhere) the GForce one won't clear the stock style exhaust on our cars. I think they private label the same unit for Jegs, Summit, etc.
But it appears the Hooker crossmember (12644HKR-1 and 12656HKR) will work. The crossmember hugs the floorpan on the passenger side.
I'm still planning to adapt my stocker, I want to work out a bolt-on solution that doesn't require welding. But its great to see there is an off-the-shelf bolt-in unit.
The low profile urethane mount lands right on top of the stock crossmember. Its not centered front/back, so we are going to slot the mounting tabs where it bolts to the trans so we can slide it back a little, then mark it and drill thru.

There appears to be enough room that we will not need to "adjust" the body seam. (no pics for this yet). We did have to cut the one wierd ear off the driver's side of the case. Easy enough. We measured for the driveshaft, and I ordered it today. (we are test fitting using a spare case.)


Similar threads
10
2K
0
3K
Online statistics
- Members online
- 8
- Guests online
- 2,857
- Total visitors
- 2,865
Totals may include hidden visitors.