Hello danomano80 and everyone else.
Here's how you can ID any Precision Buick turbo that's been built since 2001.
Your compressor cover is secured to the backing plate with 2 bolt clamps and 13mm bolts.
Remove the clamps and you'll find either a CNC machined code, or hand engraved code that says CC_ -__ .
There's 4 codes. CCE for the E cover, CCS and CCSC for the SP and S Cast Ported covers and CCH for the HP cover.
I can tell you by looking at your pictures, you have a journal bearing turbo. But we need to find the compressor cover code to be able to ID what it is. If it's a 72mm, that tells me it's probably an old school PT7268 or PT72HPQ. Because all of the 72mm turbos made since the late 2000's have been ball bearing.
Now that we have that figured out, let's move to the hot side and figure out what turbine wheel your turbo has, so we can be 100% positive on what you've got.
Unbolt the 4 bolts on the downpipe and pull it away from the turbine housing. On the flat side of the turbine housing, just above the smaller wastegate discharge hole, you will see another CNC cut part number. On the Buick turbine housings, you will see three letters, followed by one number, then a dash, then two numbers. The code looks like this. THB_-__. If your turbo is a PT7268 or PT72HPQ it should be a .85 A/R and the code will say THB5-68. The 5 means .85 A/R. The 68 means it has the 68mm turbine wheel.
Here are some pictures that show you what these codes look like.
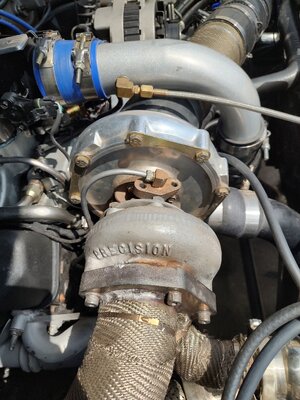
This is my new Next Gen PT6466.
In this picture, you'll see the 2 bolt backing plate clamp that's bolted down with two 13mm bolts. Remove the clamp until you find the CNC cut or hand engraved part number. On my turbo it was behind the lower clamp closest to the comp cover discharge.
View attachment 406716
Loosen both bolts and remove one so you can swing the backing plate clamp away and uncover the part number. You might get lucky on your first try, but your results may vary.
View attachment 406717
As you can see, mine is hand engraved and reads CCSC64-23. This means Compressor Cover S Cast, 64mm compressor wheel and the Next Gen series 23. When you reinstall the backing plate clamp, tighten the bolts in a criss cross fashion, hand tight. On the HP compressor cover turbos, there's no o-ring that seals the compressor cover to backing plate. And on the E and S covers, there is an o-ring that seals the compressor cover to the backing plate.
Now for ID'ing what turbine wheel your turbo has.
Just above the wastegate hole, you can see the THB5-66 part number code. THB means Turbine Housing Buick. 5 means .85 A/R and 66 means 66mm turbine wheel.
View attachment 406718
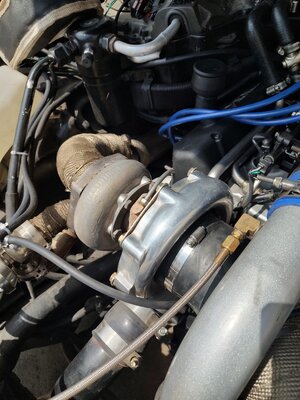
In your pictures, I didn't see the current turbo ID plate that get's installed on all PTE turbos today. That being the case, there is one more location you can look to help verify what turbo you have. Before the silver and red turbo ID plates came into being, they used to hand engrave the turbo part number, on the compressor cover's discharge. This engraving would typically be covered up by the intercooler hose. The engraving could have said PTB___-____, or it could say something like PT6262. It just depends on the time frame it was built. Today's turbo ID plate has the SN serial number and the 11 digit turbo PN or part number on it.
Here's an example of our current turbo ID plate.
View attachment 406720
That's a 20904207568 GEN2 PT6062 BB SP CC W/ BUICK 3-BOLT INLET .63 A/R HD ACTUATOR
A fantastic street turbo that's good for 750 flywheel hp.
About now, you might be asking me,
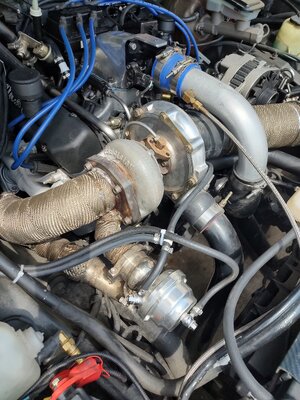
"Hey? What's up with those double nuts on your 3-bolt studs?"
That's my friends, is a Jedi Master pro-tip I was taught many years ago, from one of our real Turbo Buick Legends, Mr. Lawrence Conley.
And I'll gladly share it with everyone. It's not the only way to fix a problem, but it has absolutely worked perfectly for me.
Purchase double ended M10-1.50 x 42mm longer studs. Amazon.
Purchase standard thickness M10-1.50 SS nuts. Amazon.
Purchase M10-1.50 half lock SS jam nuts. Amazon.
You see, what happens is, customer buys a new turbo and new standard thickness nuts along with the 3-bolt gasket of their choice. Cranks the nuts down and goes racing. Well, as the new turbo goes through a few heat cycles and 16 psi to
MOON BOOST passes, heat and vibration cause the nuts to come loose. And sooner, rather than later, one or two fall off the car and you get a massive exhaust leak. Not fun.
This is where the Jedi Master trick with the longer studs and double nuts comes in clutch.
On every turbo I've installed on my own cars over the past 30 years of hot rodding Turbo Buicks, I have done this exact proceedure.
SCE copper 3-bolt gasket, P/N 4172. Summit Racing.
Permatex Ultra-Copper rtv.
Vatozone 
I coat both sides of the copper gasket thoroughly. But not so much that it's a massive blob, but enough for a good seal. Install turbo and tighten the standard thickness nuts down nice and tight, to the point the gasket's sealing ring gets a nice crush and the rtv slightly oozes out. Then I install the jam nuts nice and tight. Now for the most important step. I let the RTV cure for 48 hours before starting the car. This gives it plenty of time to cure. As well as making it easy to go back and clean up the 3-bolt joint from any blobbed out rtv. Then, after I've driven the car 3 times, I park it and let it cool down completely, to the point of having a safe to touch turbo with no heat. I then go back and check the jam nuts for tightness. Everyone I have ever done like this, has been rock solid and I've never had one come loose.
View attachment 406719
Welp, they're giving me the wrap it up signal, so I'll leave y'all with that.
Have a great weekend everybody. And let us know what you find on your turbo danomano80.
- Patrick
Precision Turbo & Engine
Technical Sales Representative