My billet TA block on Methanol/E85 w/ 160lb injectors and a Gen2 'street' car build.

marleyskater420

still needs to learn
Joined
Aug 14, 2004

So first off, welcome to my build thread (is there a "fourth wall" on the internet?). It has been a journey of 6 years, with a lot of stagnant time in-between.

This first post I am going to discuss the following:
*The goal/history of the car
*The parts on the car/going to be on the car
*People I would like to thank
*How epic the guitar solo in Freebird is
*Anything else I want to, because if you're reading this much, more than likely you'll keep reading, so HA!

The Car:
It is a 1987 Turbo T Limited with T-tops and 2 tone paint. I don't think I could have kids because I wouldn't love them as much as I love this car. All the thanks goes to my Mom, who made this all happen for me.
I started this whole ordeal when I was 23. I just turned 30, and this is the closest I've come to getting it completed, and each day it gets closer.

Do you ever remember growing up and seeing race cars or dragsters and saying to yourself "Man, one day I want MY car to be like that!"...well that is what this car is for me.
If that kind of car build sounds like something you may totally dig, then keep reading ...

The Build:

Turbo System:

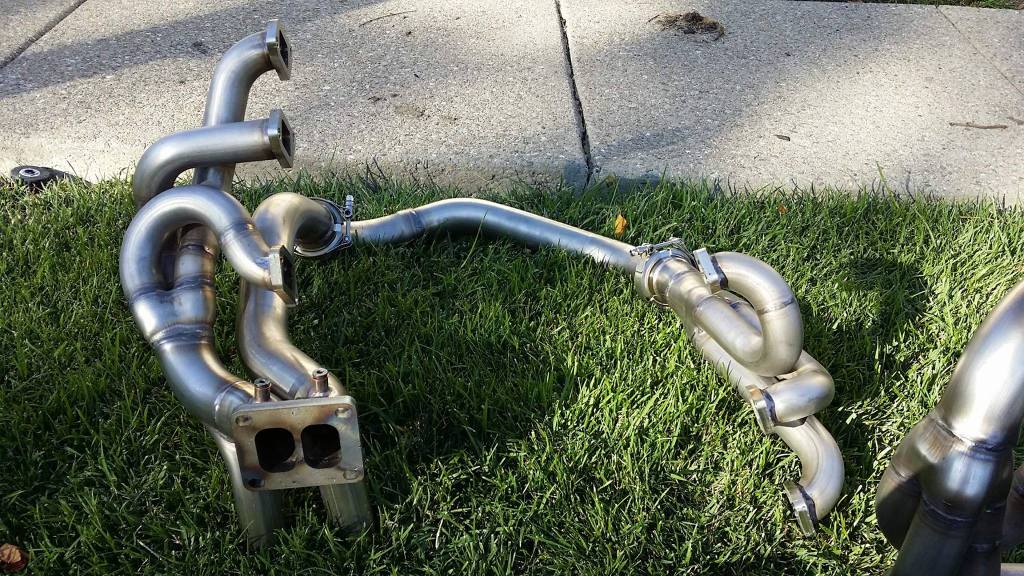
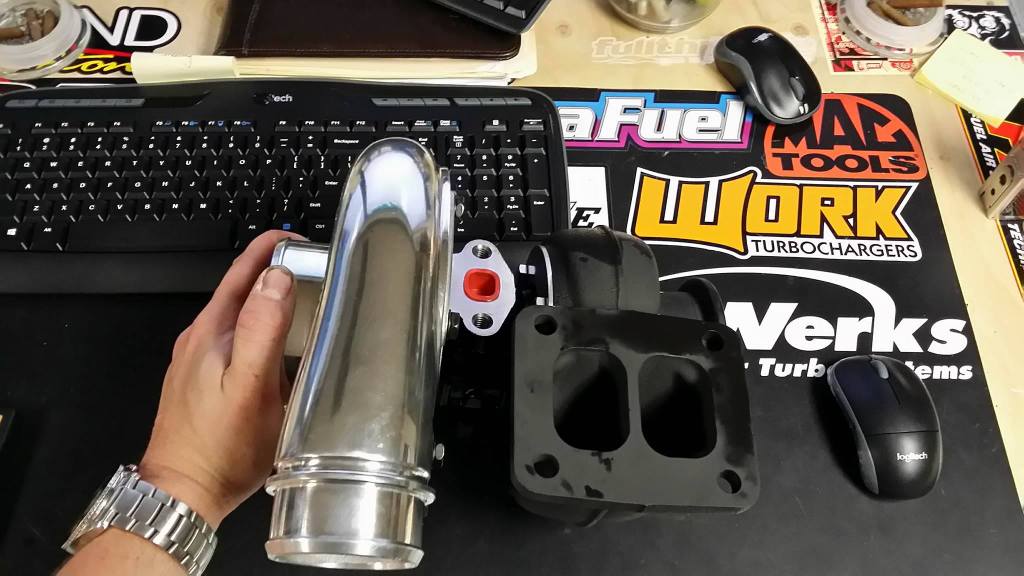
*Gee M Racing 1 3/4" headers for Stage 2 heads, with a 4 bolt Twin Scroll housing, with wastegate provisions plumbed off header sides for dual wastegate operation. EGT bungs will be welded into every primary, along with a pressure transducer bung and O2 sensor bung located just before the mounting flange. I want to send a HUGE Thank you to Juha from Gee M Racing! https://www.facebook.com/GeeMRacingRy/
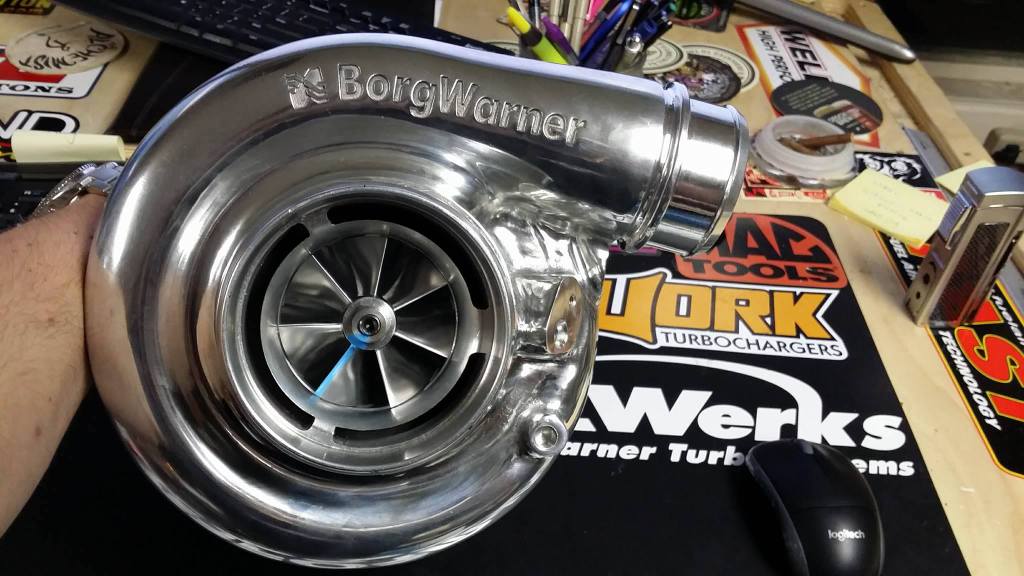
*Work Turbo 69/73 300SXE, 4-Bolt, Twin Scroll housing -big thanks to Reed and Trae www.workturbochargers.com
*4" MAF pipe
*FMIC will hopefully be a custom Bell Intercooler unit that will support 1600+hp.
*Custom downpipe fabricated by Reed at Work Turbo - BIG Thanks to WORK Turbo!
*Dual Turbosmart Compgate 40's for wastegates -
*Boost control handled via a electronic wastegate solenoid controlled by the MS3 ECM

Fuel System:
*8 gallon fuel cell in trunk
*Weldon 2345A from Justin at Kinsler Fuel Injection www.kinsler.com
*Weldon 14000 fuel pump controller
*-12 feed to pump, -10 to fuel rails to dual -8 inlet at rails. -6 return
*Kinsler 45micron pre-pump fuel filter
*Kinsler 25 micron post-pump fuel filter
*160lb injectors
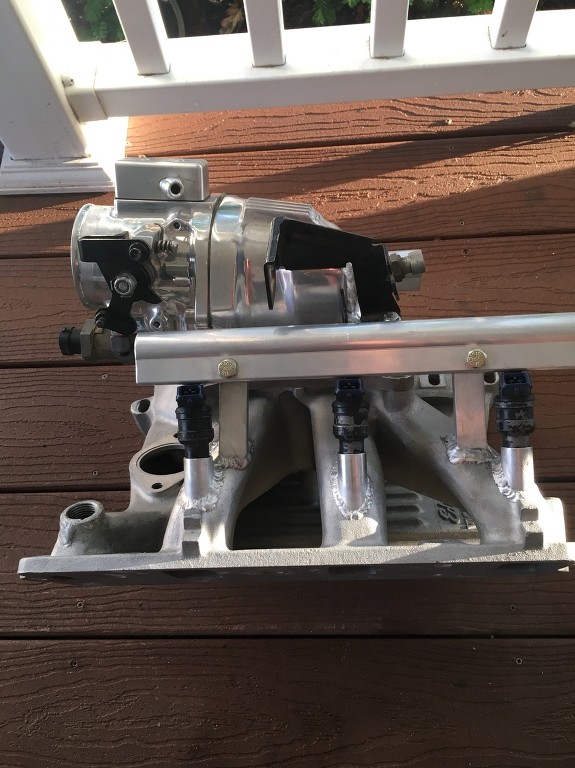
*Custom billet fuel rails for the Stage 2 intake manifold
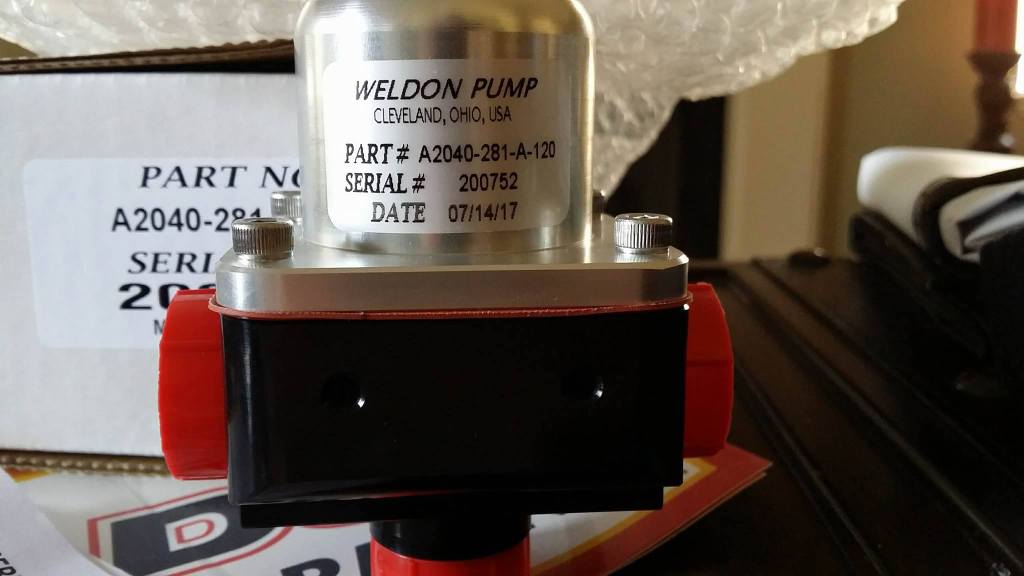
*WELDON A2040 AFPR - BIG Thanks to Jim Craig at Weldon!! www.weldonracing.com
*Razor's Fuel Pressure transducer for FP monitoring

Engine:
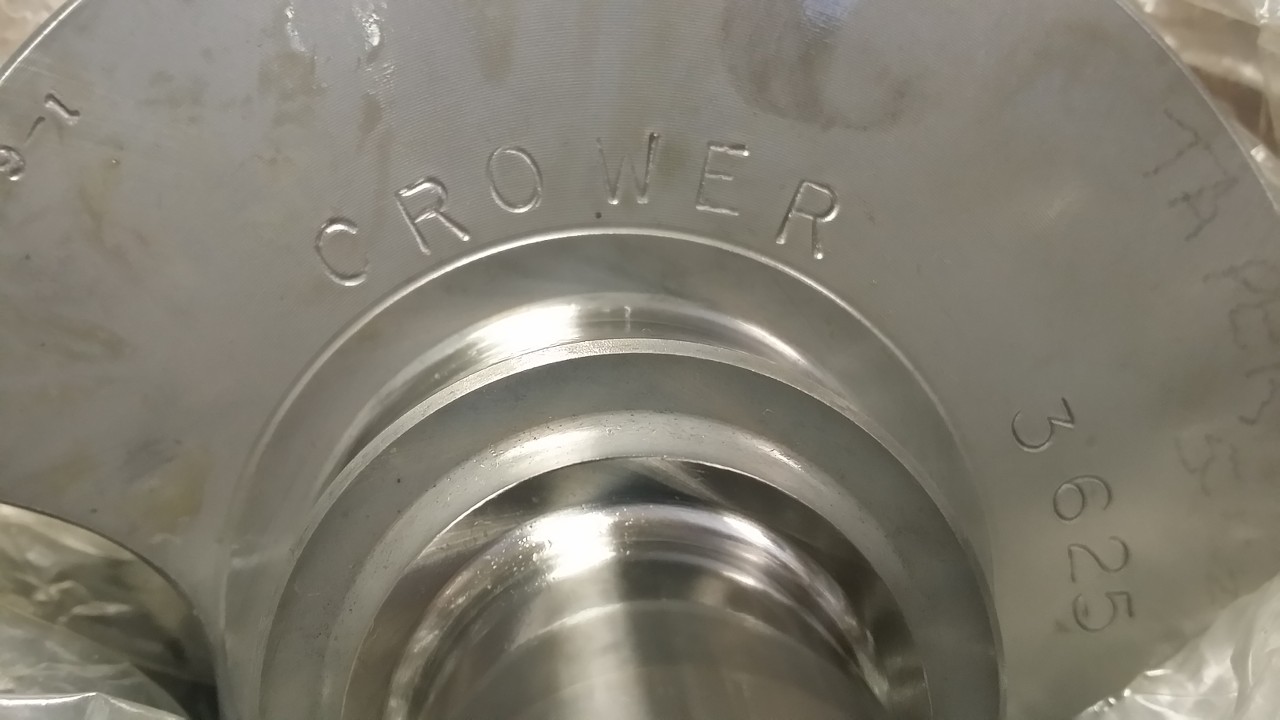
*Kenny Duttweiler built 4.00" Bore TA Block -thank you to Tim at TA Performance
*3.625 billet Crower wide journal crank
*6.3" wide journal Crower billet connecting rods
*Custom pistons as spec'd by Kenny Duttweiler
*Billet cam TBD from Kenny Duttweiler
*Lifters TBD by Kenny Duttweiler
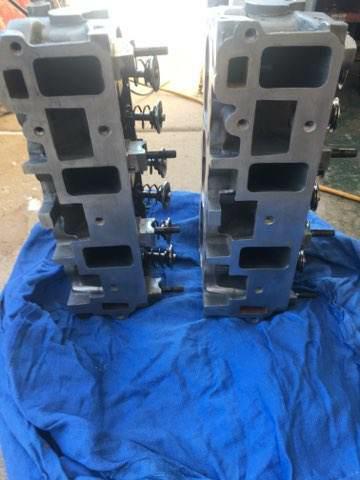
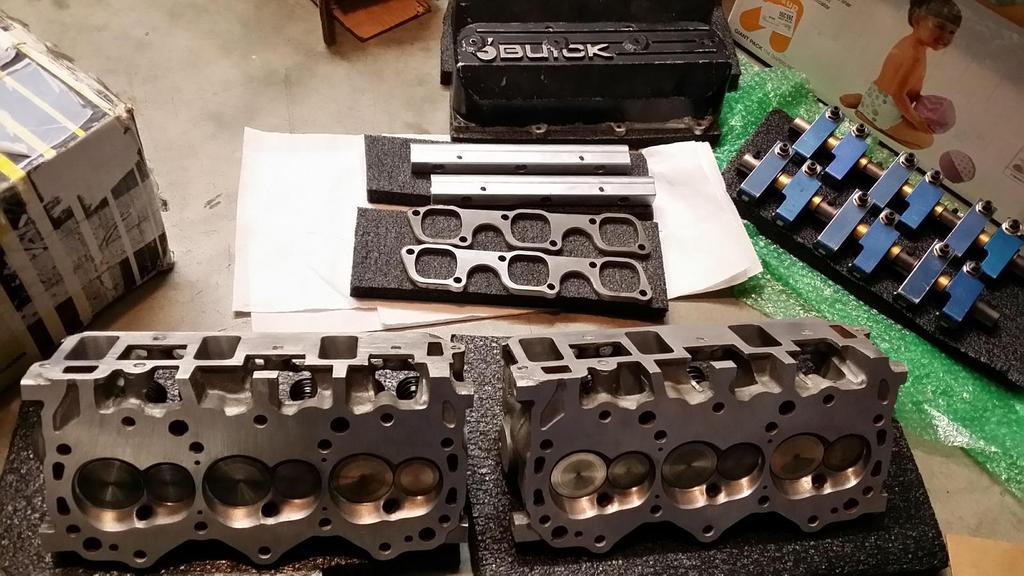
*Stage 2 cylinder heads with Chapman Racing level 3 port work
*Stage 2 carb intake converted to EFI

*72mm billet TB for a EFI-converted Stage 2 carb manifold
*T&D offset roller rockers; 1.64 ratio for intake, 1.58 ratio for exhaust

*AC and Heater box removed
*PS removed and replaced with S10 manual box
*Magic Vodoo Dust

Suspension:
Front:
*SC&C double adjustable upper CA's with Howe extra tall ball joints (Thanks to Mark Savitske)
*SPC lower control arms with Howe extra tall ball joints
*Moroso springs
*Varishock double adjustable shocks
*Hellwig tubular front swaybar
*PST polygraphite super front end kit

Rear:
*Hellwig pro touring adjustable tubular swaybar - Thank you Mark Savitske! www.scandc.com
*Varishock double adjustable shocks
*Replacement johnny joints for rear end housing bushings
*UMI double adjustable LCAs with roto joints
*UMI rear shock tower brace
*UMI weld-in LCA relocation brackets
*Rear UCA relocation bracket and double adjustable arms- thanks to Boost Crew Motorsports!
*QA1 coilover springs

Transmission:
*Janis Transmission 1000hp rated, fully rollerized 200r4 with all the billet parts you can think of
*PTC 9.5 spec'd by Dusty Bradford


Engine Management/Ignition:
**Megasquirt MS3 Ultimate ECM with custom Plug and Play harness by RPS
*LC-1 wideband
*TR-6 ignition
*Eventually a Coil on Plug system with Pantera (IGN-1A) coils
*Custom RPS mounting bracket for CoP system

Things I would like to do one day:
*Built 9" rear end..maybe a Chassisworks Fab 9, or Currie F9, or TRZ 9"

*4L80E

Now for the Thank-Yous, in no particular order..
*My Mom, who is the coolest Mom ever. Period. No questions. She's fucking legit.
*Dean
*Ed
*Mark E
*Jerry
*DonWG
*Danny Todd
*Eric at Turbotweak
*Tim at TA Performance-...Tim has more patience for my crap than just about anyone
*Justin at Kinsler -BUY YOUR FUEL PARTS FROM JUSTIN. DUDE IS LEGIT!
*Trae/Reed at WORK Turbos - BUY YOUR TURBOS FROM THESE DUDES!
*Jeremy P.
*Mr. Jim Craig from Weldon Racing - For making THE best fuel pumps out there!! BUY WELDON!!
*Mike C.
*Ken Mochida- THE Mac Tool MAN!! If you're in CA and need MAC stuff, hit him up!
*Mark Savtiske from SC&C for all my badass suspension parts!
*I'm sure I'll be remembering much more and add them to this list..
*Juha from Gee M Racing!


My Stage 2 Top end with Chapman-ported heads arrived!


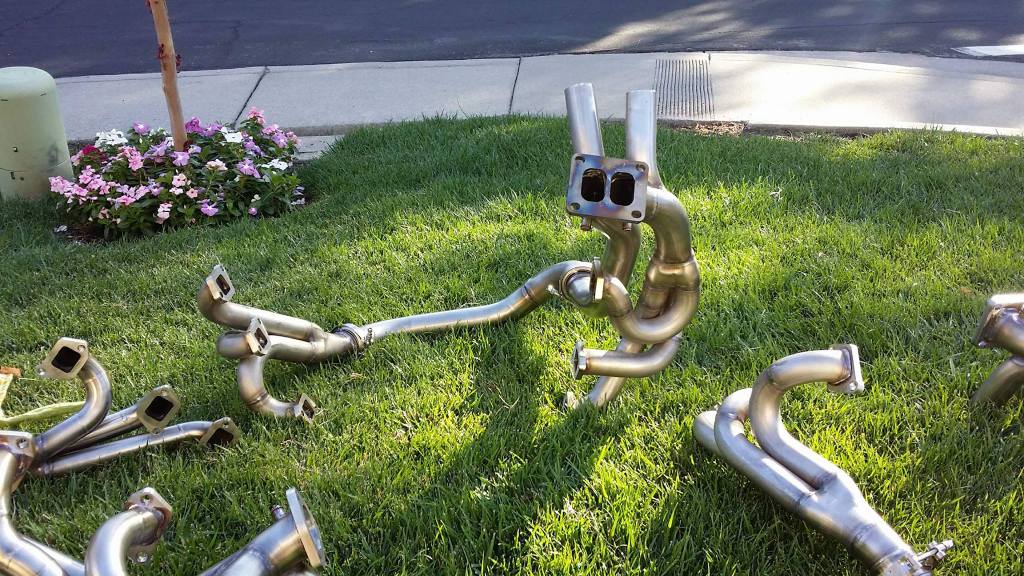
Guess what just got finished yesterday...my new Race Headers from Gee M Racing! Check my most recent post in this thread for more info on them!


New Weldon A2040 Adjustable Fuel Pressure Regulator! Thank you Mr.Craig!! www.weldonracing.com :


My WORK Turbo has arrived!! A Borg Warner 300SXE 69/68 with twin scroll, 4-bolt turbine housing and polished compressor cover! Huge Thank you to Reed at WORK Turbochargers!! www.workturbochargers.com :


Nice shot of the twin scroll housing:


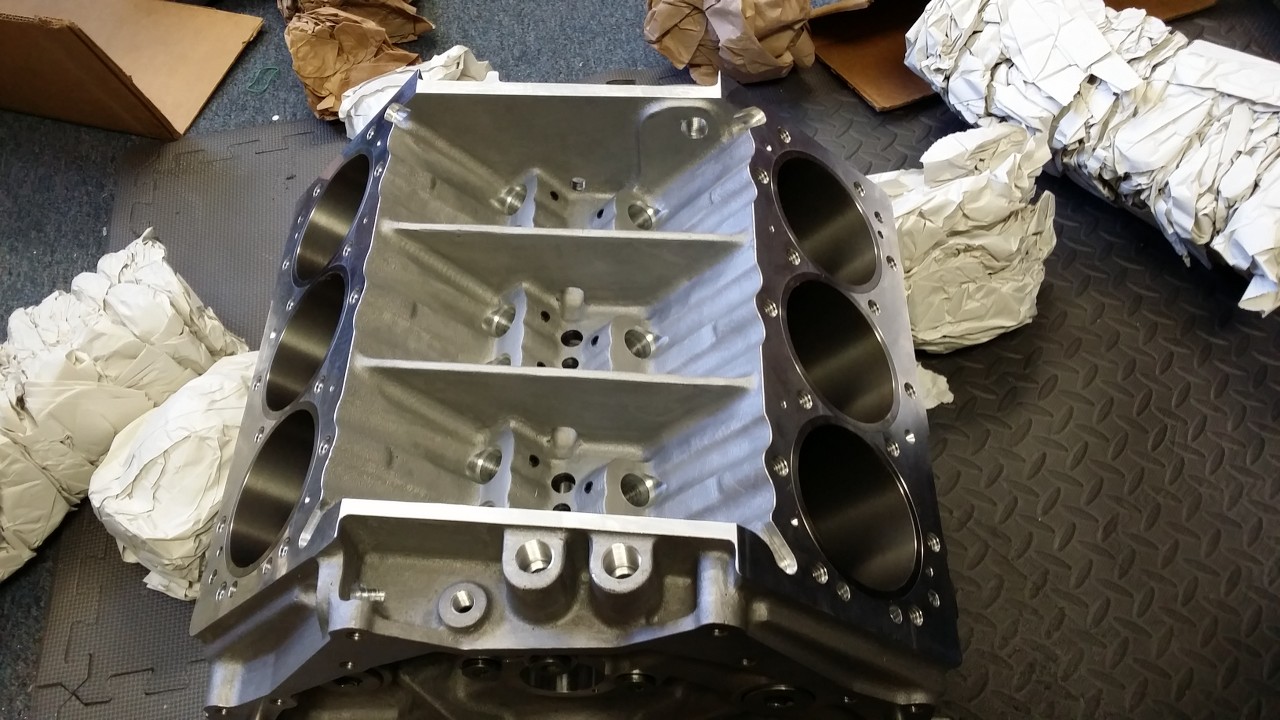
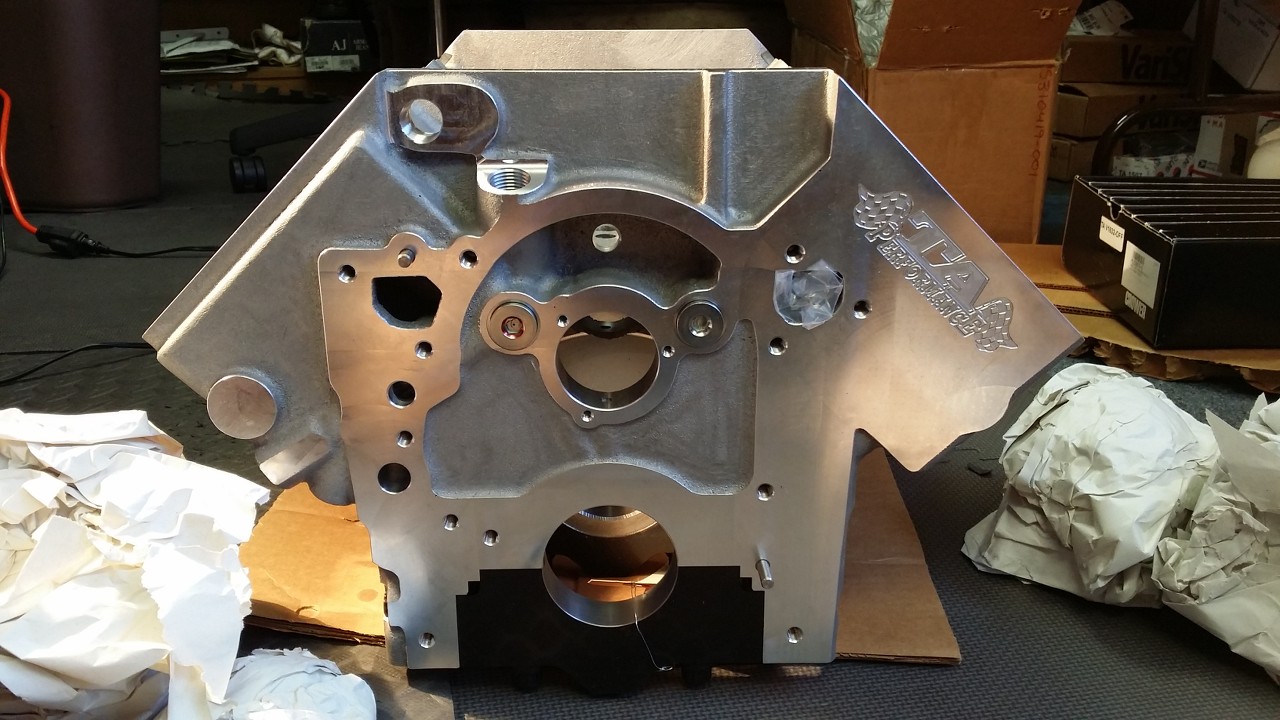
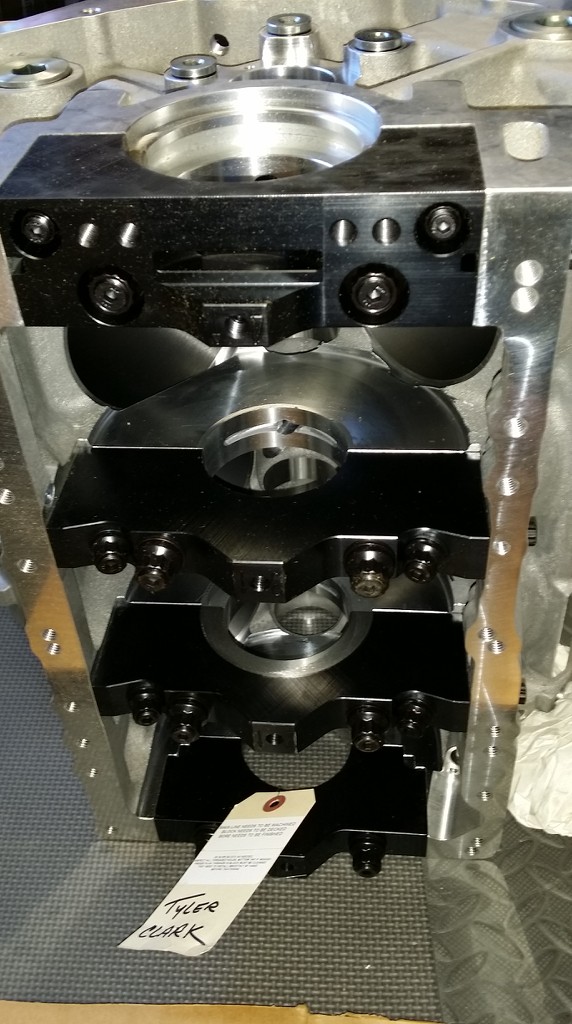
The TA block has arrived!!!! :


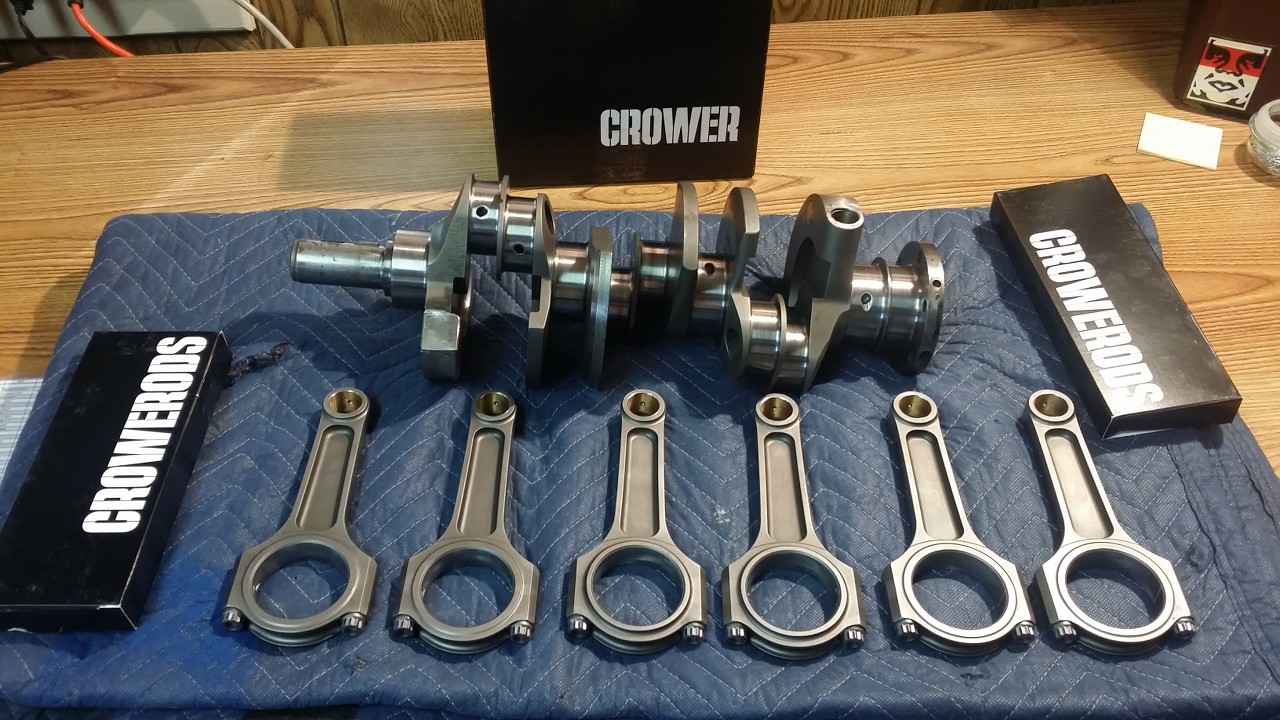
New Crower crank arrived:


Pics of the new Crower billet rods next to the wide journal L.A. Enterprise Kryptonite billet stroker crank:


Check out the new rear UCA's from Boost Crew Motorsports that allow you to adjust your Instant Center:


My most recent attempt at trying to plumb the fuel lines:


100_0487.jpg100_0498.jpg100_0503.jpg100_0491.jpg100_0543.jpg
 
Last edited:
Few things:
The Jegs filters on the fuel rails will be taken off. The A1000 I'm just borrowing for the time being until I install the weldon. The rear driver spring is tilting because of how off the rear end is sitting due to the brackets not being secure and moving about 3" and shifting everything.

Heres a pic of the car, the cool stuff Justin hooked it up with, and the flow sheet at 16.5v that shows the pump puts out an extra 15gph than it should :D

Also a good comparison pic between the different control arms and brake rotors
 

Attachments

  • 100_0504.jpg
    100_0504.jpg
    56.6 KB · Views: 1,181
  • 100_0527.jpg
    100_0527.jpg
    55.6 KB · Views: 1,138
  • mms_picture.jpg
    mms_picture.jpg
    49.9 KB · Views: 1,055
  • mms_picture.jpg257.jpg
    mms_picture.jpg257.jpg
    30.5 KB · Views: 1,060
  • mms_picture.jpg258.jpg
    mms_picture.jpg258.jpg
    70.1 KB · Views: 1,094
Tyler,

This is looking great.
I love that you are doing your own thing.
Please post some video.
If you need help I have a YouTube account and can upload them for you.
 
Tyler,

This is looking great.
I love that you are doing your own thing.
Please post some video.
If you need help I have a YouTube account and can upload them for you.

Thanks man! If it wasn't for my friends being there and helping me (you know who you are) none of this would have been possible. I am forever grateful to those that help this dream come to fruition.

I have a 3 second video on my phone but its too large to send. I'll try to see what I can do about getting one on my actual camera.

Attached is a photo of the interior of the car to show how clean the leather and what condition its in (besides the ECM and papers), along with the GNX-style gauge cluster (which is for sale) and a better shot of the engine from the side and of how the fuel lines in the engine bay are run.
 

Attachments

  • mms_picture.jpg257(2).jpg
    mms_picture.jpg257(2).jpg
    58.4 KB · Views: 1,100
  • mms_picture(2).jpg
    mms_picture(2).jpg
    66.2 KB · Views: 1,092
  • 100_0489.jpg
    100_0489.jpg
    94 KB · Views: 1,129
  • 100_0505.jpg
    100_0505.jpg
    61.3 KB · Views: 1,208
  • 100_0506.jpg
    100_0506.jpg
    59.4 KB · Views: 1,126
Some better pics of the exterior of the car:
 

Attachments

  • car.jpg
    car.jpg
    57.3 KB · Views: 978
  • DSC01374.jpg
    DSC01374.jpg
    67.8 KB · Views: 1,017
  • DSC01384.jpg
    DSC01384.jpg
    64.2 KB · Views: 970
  • DSC01376.jpg
    DSC01376.jpg
    59.5 KB · Views: 967
Download the video from your phone to your computer and then email it to me.
 
Download the video from your phone to your computer and then email it to me.

I can't. The vids are saved to the phone, but the computer doesn't recognize the phone as an external storage device, and the memory card is messed up and won't transfer files off itself or accept file transfers. Otherwise I'd put it on the card and then upload it.

I'll just make new vids :D
 
great car..love your setup! mine runs great on one of eric's 6.0 chips........Are you telling me eric can make a chip that supports 160's now?? my 120's are getting close.
If so, how is the idle?

oh, and love the Weldon pump choice, putting a 2035 in mine as well.
 
great car..love your setup! mine runs great on one of eric's 6.0 chips........Are you telling me eric can make a chip that supports 160's now?? my 120's are getting close.
If so, how is the idle?

oh, and love the Weldon pump choice, putting a 2035 in mine as well.

I don't want to advertise anything for him. Mine was kinda a project for him and Mr.Bailey to tackle. I haven't driven it besides around the corner, but it idles around 1100rpm. We had to add in 25% fuel on the Gen2 to get it to idle correctly. This is with E85 though. They said that we're going to have to be sending chips back and forth for a bit to really get it dialed in perfect. Erik is really helpful though and a great asset to the community.

If you haven't gotten your pump yet, hit up Kinsler man! I'm telling you Justin hooks it up FAT!!

and its not a 2035, its the 2345 :D :p :) and a higher output than normal one at that! (Again, Justin@ Kinsler took the time to find me the highest flowing pump-it flows over 15gph MORE than what a normal 2345 flows!! THAT is customer service man!!)
 
I'm looking forward to you getting some seriously fun seat time in it and reporting back. :)
 
So while I was taking off the front suspension I had time to weigh everything on a digital scale and compare the different setups. Here are my results:

All of these are done on the same scale within 10 minutes of each other. Each weight is for 1 piece (1 control arm, 1 rotor, etc) =

Upper Control Arms:
*Stock upper control arms with ball joint: 8.8lbs
*Global west control arms with ball joint: 8.8lbs
*SPC double adjustable arm with Howe Xtra tall ball joint: 6.6lbs

Brake Rotors:
*Baer 13" slotted and vented rotor (no wheel hub) :19.6lbs
*AFCO vented rotor with hub: 16.6lbs
*Stock rotor with hub: 19.1

Lower Control Arms:
*Stock lower control arm with PST bushings and Howe Xtra tall ball joint: 14.2

Spindles:
*B-body spindle and hub: 18.6lbs
*Stock spindle: 12.4lbs

Brake Calipers:
*Baer caliper with no mounting bracket: 8.4lbs
*Baer caliper with mounting bracket: 9.8lbs
*Stock caliper: 8.2lbs

So my old setup consisted of the following (I'm leaving out the LCAs because they basically didn't change):
GW UCAs with ball joint: 8.8lbs x2 = 17.6lbs
B-Body spindles and hub: 18.6 x2 = 37.2lbs
Baer rotors: 19.6 x2 = 39.2lbs
Baer calipers with mounting brackets: 9.8 x2 = 19.6lbs

Total weight for old setup: 113.6lbs

My new setup:
SPC stage 2 arms with ball joint: 6.6 x2= 13.2lbs
Stock spindles: 12.4 x2 = 24.8lbs
AFCO rotor and hub: 16.6 x2 =33.2lbs
Stock caliper: 8.2 x2 =16.4lbs

Total weight for new setup: 87.6lbs thats a savings of 26lbs! And over 6lbs in rotational weight!

Hope this gives guys looking to reduce weight in their car an idea of the key points to focus on for the most weight loss.

Here is my thread in the suspension section with more photos of the spindles and control arms:
http://www.turbobuick.com/forums/br...ors-calipers-i-recently-took.html#post2889124

I have more photos if anyone would like them.

Big thanks to Jason for taking the time to take these photos, and getting some really good comparison shots.
 
Don't know how I missed this thread. Nice looking TB you got there. I like the front suspension mods. Did you change the height of the front with any of this new setup? What did you go with for brake shoes?
Oh, while at the AFCO site, all I see are 5x5 rotors. Is that what you used? Duh, realized they are drilled for both patterns..

Thanks man.

The springs were 14" springs but we also took a lot of weight off (PS, AC, diff brakes, etc) so I don't know how much it lowered currently.

I used stock calipers and some soft pads with no metallic in them, like 30$. Soft compound because its a drag car.

The AFCO rotors are 70$ each, stock size, vented, 2.5lbs lighter, and 25% stronger.

I believe the new Howe ball joints do lower the car about .5" or so. Not 100% on that though. From the site "It also lowers the car .5”-.75” and moves the spindle and steering arm to a more favorable height radically improving the bumpsteer."

Eventually I want to get some Varishock double adjustable shocks for the front and rear, and then I'll probably be done with my suspension.

When its all done I can measure the ride height for you and post it up. Right now theres no wheels on the front :p .
 
Top